Authentication
The Authentication Service provides a full authentication framework for stateless and session-based applications. It authenticates requests against back end providers and offers interpretation and parsing of request scope information to provide Single-Sign-On (SSO). Authenticated requests will have user accounts created and synchronized within Cloud CMS either automatically or as part of a registration form process. Authenticated users have Cloud CMS connectivity state managed for them.
Using the Authentication Service, you can configure your Node applications so that end users can login using their credentials for pluggable Authentication Providers. The following providers are available out-of-the-box:
Many of these Authentication Providers are built using the Passport.js library - a well-established library that offers a wide variety of connectors for a diversity of authentication strategies. Implementing additional strategies is fairly straightforward.
The Authentication Service works with request scope variables to determine who the user is. It is compatible with Express and also supports SAML 2.0, JWT (Java Web Token) public and other trusted tokens.
Configuration
To use the Authentication Service, you must first define a Strategy. At a minimum, a Strategy defines an Authentication Provider. It may also define an Adapter to be used to parse an incoming request and determine the user identity (and any trusted user information that can be extracted from the incoming request). And it may also optionally define an Authenticator to be used to populate or remove Node application state (such as session state) when a user logs in or logs out.
As such, Strategies coordinate the following components:
- Providers
- Adapters
- Authenticators
A Strategy further sets up how the authentication flow should execute. It lets you set up automatic registration, failure pages, redirections and custom function handlers for various outcomes that my occur as part of the authentication or Single-Sign-On (SSO) process.
You configure the Authentication Service in the auth block of the server.start() call.
A fully-descriptive configuration is shown here:
{
    ...,
    "auth": {
        "adapters": {
            "{adapterName}": {
                "type": "{adapterTypeId}",
                "config": {
                }
            }
        },
        "providers": {
            "{providerName}": {
                "type": "{providerTypeId}",
                "config": {
                }
            }
        },
        "authenticators": {
            "{authenticatorName}": {
                "type": "{authenticatorTypeId}",
                "config": {
                }
            }
        },
        "strategies": {
            "{strategyName}": {
                "adapter": "{adapterName}",
                "provider": "{providerName}",
                "authenticator": "{authenticatorName}",
                "successRedirect": "/",
                "loginRedirect": "/login",
                "loginHandler": function(req, res, next) {
                },
                "noAccountRedirect": "",
                "noAccountHandler": function(req, res, next) {
                },
                "registrationRedirect": "",
                "registrationHandler": function(req, res, next, strategyId, userIdentifier, userObject, groupsArray, mandatoryGroupsArray, info) {
                },
                "logoutRedirect": "",
                "autoRegister": true,
                "adapterFailureRedirect": "",
                "adapterFailureHandler": function(req, res, next, err) {
                },
                "userSyncErrorHandler": function(err, req, res, next) {
                }
            }
        }
    }
}
Authentication Providers
An Authentication Provider connects the Authentication Service to a back end provider such as a SAML 2.0 endpoint, Facebook, Google or Microsoft Azure Directory Services. The Authentication Provider handles the handshake with the back end service and does the appropriate URL juggling necessary to let an end user sign in.
To use an Authentication Provider, you need to define a Strategy (via config) that has its provider field set to identify the Authentication Provider you wish to use.
A very simple config might look like:
{
    "auth": {
        "strategies": {
            "mystrategy": {
                "provider": "facebook"
            }
        }
    }
}
We now have a Strategy called mystrategy that will use the facebook provider (which is available out-of-the-box).
To manually authenticate with a Strategy, you follow a flow like this:
- The browser is directed to
/auth/{strategyId}. In this case, you'd go to/auth/mystrategy. - The browser is then redirected to the authentication provider's login page.
- The end user logs in using their credentials.
- The authentication provider may then ask the user if they want to grant the application rights to log you in.
- If they fail to log in or do not grant rights, the browser is redirected to a failure page.
- If they do log in and grant rights, the browser is redirected to
/auth/{strategyId}/callback
The Authentication Service provides the HTTP endpoints for the /auth/{strategyId} and /auth/{strategyId}/callback handlers. You don't need to do any additional coding - these will be available for you to use.
In general, the callback receives a code that can be used to validate that the callback wasn't spoofed. The callback generally does the following:
- Checks with the authentication provider to verify the code.
- Acquires the access token and refresh token and user profile for the user.
- Checks to make sure that a Cloud CMS user exists in the domain for the application.
This is a pretty sophisticated flow and a lot of things could go wrong along the way. There could be connectivity issues. Or the user might fail to authenticate against the Authentication Provider.
They may authenticate but not yet have a user account within Cloud CMS. Or they may authenticate and already have a user account but their user properties may have changed.
There are a wide variety of scenarios that could occur. When you define your Authentication Strategy, you can finely describe what the Authentication Service should do for these.
For example, the Strategy supports an autoRegister setting:
a. If a user doesn't exist and autoRegister is false, redirect to the failure page. b. If a user doesn't exist and autoRegister is true, then create a user.
It also supports a registrationRedirect setting.
c. If a user doesn't exist and registrationRedirect is set, then redirect the user for registration. The registration form, once submitted, results in a user being created in Cloud CMS and the process continues.
And then things continue:
- The Cloud CMS user is loaded and authenticated against.
- If you've supplied a custom login function, it will be executed.
The following Authentication Providers are available out-of-the-box:
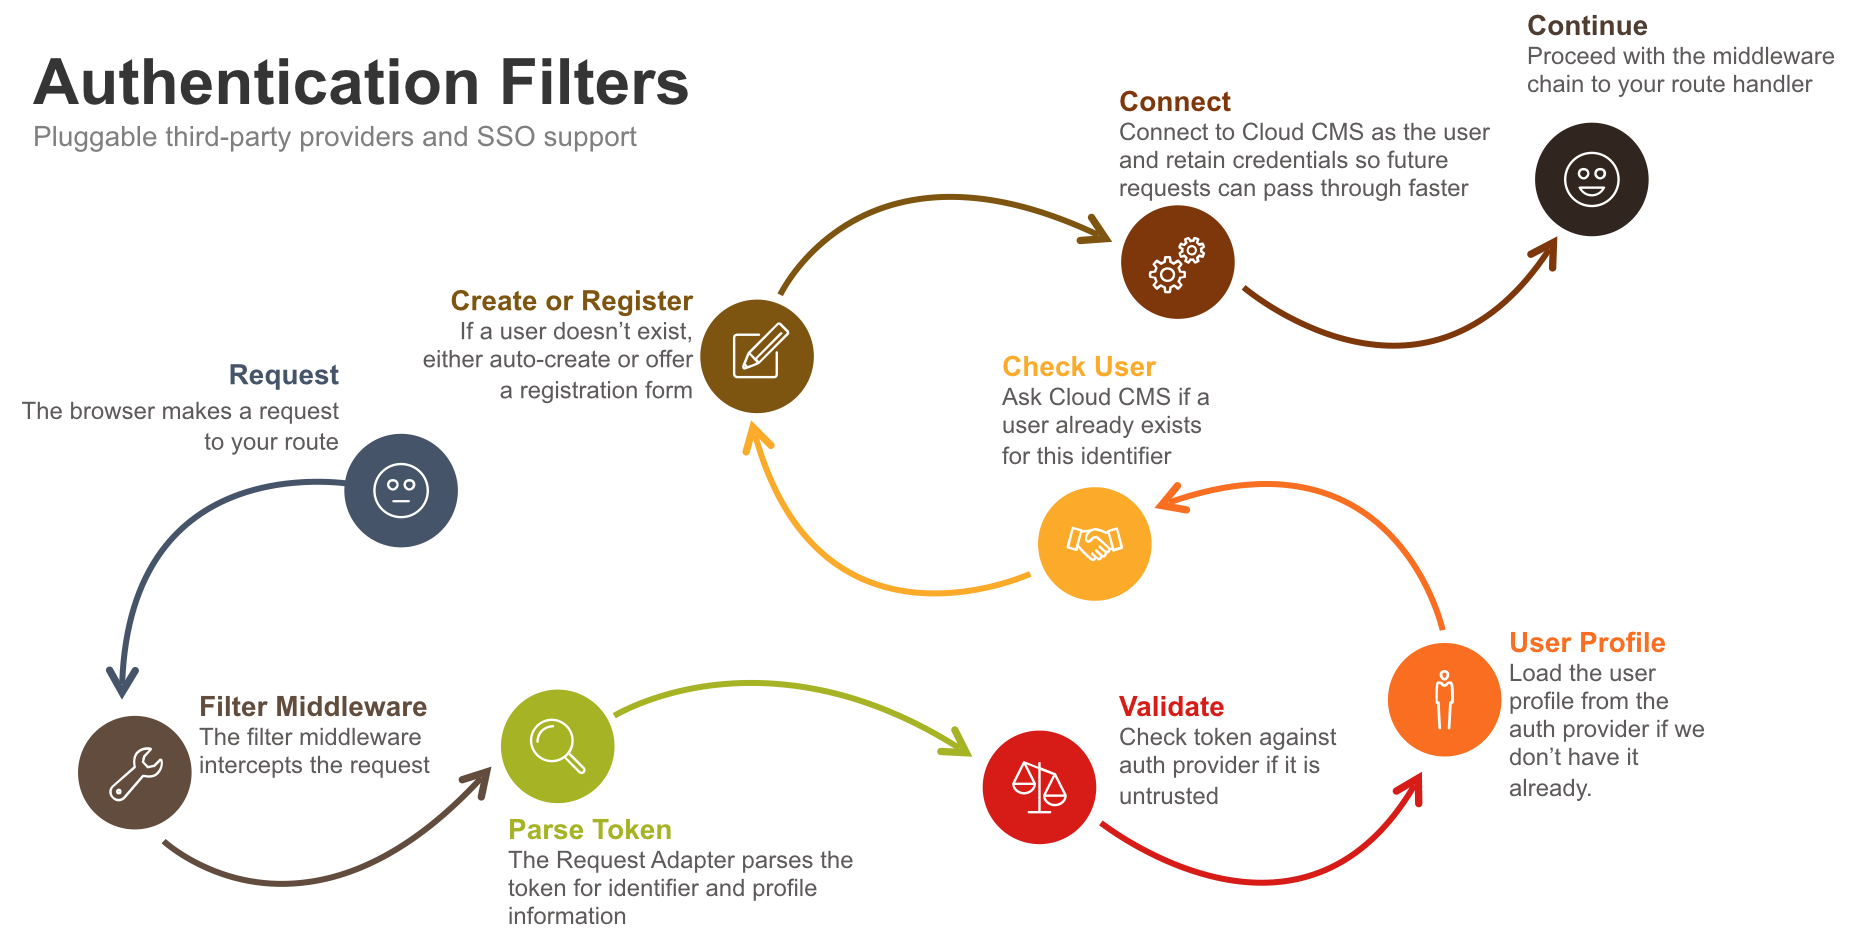
Authentication Filters
In the previous section, you saw how a user can be authenticated by explicitly redirecting the browser to /auth/{strategyId}. The user logs in against the Authentication Provider and is then redirected back to /auth/{strategyId}/callback and the Strategy then takes over all completes the rest.
This is typically done when someone clicks on a button to say "log in". You then have the option to take them to a login page and the URLs mentioned above are suitable for that.
However, there may be situations where simply want to protect routes within your app. Certain routes may require an authenticated user. You can protect those routes by binding in an Authentication Filter.
By default, when requests arrive to the Express server, they are handled by Express middleware and eventually make their way to your route handler. The Cloud CMS authentication services don't step in the way and nothing really exciting happens at all.
In other words, the framework assumes by default that you're handling end-user authentication on your own, perhaps using an Express session or talking to your own custom database. There is no implicit assumption or requirement that you use the framework's authentication providers, Cloud CMS user sync or Cloud CMS backend user authentication.
This is assumed to be true because most often, in practice, your authentication requirements will differ from client to client and customer to customer. Some folks strive to build a purely standalone app and others want Cloud CMS to handle 100% of the authentication. Still others want to use Google as their authentication provider and have user accounts synchronized on-the-fly. And still others may have to bulk load user identities from an LDAP server and populate them in to Cloud CMS, then use an SSO token to automatically authenticate.
In the end, there are a lot of authentication strategies that you can imagine. Fortunately, the authentication framework's filters give you a way to adapt to most if not all of them.
Suppose, for example, that you required an authenticated user for access to /documents/*. You might have a route like this defined:
app.use("/documents", function(req, res, next) {
   ...
});
To protect this route, you can bind in an Authentication Filter to sit ahead of your handler. The Authentication Filter runs the Strategy that you define. Like this:
var auth = require("cloudcms-server/middleware/authentication/authentication");
app.use("/documents", auth.filter("mystrategy"), function(req, res, next) {
   ...
});
Now when a request comes along to /documents/*, it will run through the filter.
Filters execute a series of logical steps that incorporate:
- Adapters
- Authenticators
- Providers
These are bound up in a strategy along with any of the strategy's configuration options.
Adapters
An Authentication Adapter parses an incoming request and tries to extract identifier information from it regarding the current user. It may not be able to parse anything (which is fine). The goal of an adapter is to glean as much information as possible - whether a user ID or a full user properties object.
The goal of an adapter is to extract properties from the incoming identifier. These properties either contain a profile or they contain a token that can be used to acquire a previously loaded profile from cache.
The information gleaned is either "trusted" or "untrusted". By default, all information is understood to be untrusted which means that the request is claiming something about the incoming user (but the framework doesn't know whether it is valid). The framework must then assert whether the claimed aspects about the user are true.
The following Authentication Adapters are available out-of-the-box:
Authenticators
Once a user has been authenticated, they often need to be signed on to an existing framework. An Authenticator provides a way to do that. It offers login and logout functions that take the resulting user and the req request and can then use those to authenticate to the framework.
The default Authenticator handles authentication to Node.js Express using a Session.
The following Authenticators are available out-of-the-box:
Filter Flow
The filter runs the following logic:
- If an Adapter is configured, the Adapter's
identifyfunction is called and given the request to interrogate.
The identify method parses the request and determines how to proceed:
- If it returns an error, things halt and the filter drops to Step 5 with the error.
- If it indicates to redirect, then the browser is redirected to the indicated URL or to
/auth/{strategyId}. - If no
propertiescome back, things halt and the filter drops to Step 5 with an error. - If
propertiescome back, then things proceed.
- If an Authenticator is configured, the Authenticator's
isAuthenticated()function is called and given thepropertiesthat the Adapter resolved.
If the Authenticator determines that the request describes a user who is already authenticated, then there is no additional work to be done. The user
propertiesare copied intoreq.identity_propertiesand the filter drops out to Step 5.If the
propertiesaren't trusted but have atokenfield on them, a cache of trusted properties is consulted to see if we've evaluated these properties to be trusted in the past. If so, the properties are upgraded to trusted.If the
propertieshavetrustedset totrueand they already contain aprofile, then thepropertiesare copied toreq.identity_propertiesand the flow skips ahead to Step 4.Otherwise, things continue.
- At this point, we either have a
propertiesthat is untrusted or we have apropertiesthat is trusted and lacks a profile. In the former case, we need to ask an identity provider to do 2 things (first, to assert the identity of the user is correct and second, to load the user profile for us). In the latter case, we just need the identity provider to load the user profile.
To do this, an Authentication Provider is needed. The Authentication Provider connects to the Identity Provider. Usually the Identity Provider may be a third party login mechanism (such as Google or Ping) or it may be a separate or integrated login service (using the Local provider).
a. If the properties aren't trusted, the Provider's verify() method is called. It is given a copy of the properties and can then assert whether the properties describe a valid user. This prevents spoofing of credentials through request manipulation. Incoming requests are implicitly not trusted and must be vetted against a back end identity provider.
If verification fails, an error is generated and the filter drops out to Step 5 with an error.
The verify method may also succeed in which case it supplies us with a user profile. If it does, the profile is parsed using the Provider's parseProfile method to extract any user profile attributes, user groups, mandatory groups and so on. This is then attached to the properties. The properties are then added to the cache of trusted properties and things proceed to Step 3.
b. However, if the properties are already trusted, then the Provider's load() method is called. This method has the sole responsibility of loading the user profile (without verification). The user profile is parsed using the Provider's parseProfile method to extract any user profile attributes, user groups, mandatory groups and so on.
The properties are then added to the cache of trusted properties and things proceed to Step 3.
- At this point, the system has asserted the identity of the user and has parsed a suitable set of user properties. The next step is to load or auto-create the Cloud CMS user (inside of a Cloud CMS Domain) so that Cloud CMS will have everything it needs from a runtime perspective to represent the user, check ACLs, and so on.
The system checks its user cache to see if this user was already loaded. This is a very quick check. If it finds it here, it means the user already exists in Cloud CMS and everything is all set. Cloud CMS gets the user from cache and the properties are updated to include:
properties.gitana_user = gitanaUser
properties.gitana_user_id = gitanaUser.getId()
properties.gitana_platform = platform
properties.gitana_access_token
properties.gitana_refresh_token
properties.gitana_ticket
properties.gitana_user_connection
However, if the user was not found in cache, then Cloud CMS will make an API call over to the Cloud CMS API to load the user. It passes along the user identifying information and asks for the Cloud CMS user back.
If the user is found in Cloud CMS, it is placed into the cache, the properties are updated and things continue and everyone is happy. If you have an Authenticator configured, then the Authenticator's login() method will be called to log this user into your underlying application framework.
However, if the user is not found, we have a problem. We either have to manually create the user in Cloud CMS and associate the identifying information (so that a future request will match these up) or we have to allow the system to automatically create the user for us.
The autoRegister setting on the Strategy lets us turn on automatic registration. This is on by default. With this turned on, the system will take some additional steps.
The system will make a call over to the Cloud CMS API and passes along the user properties. The Cloud CMS API then makes user that a user exists in the Application Domain to represent the currently authenticating user. It also makes sure that any required User Groups exist and that the user has been assigned to any Groups, Teams or Projects that are needed. These are optionally described in the properties as determined in Step 3. Typically, this information comes from a SAML 2.0 back end in the form of assertions but may also come from a JWT payload or some other aspect of the request payload.
The resulting user is then added to the user cache. The very same properties listed above are populated as well.
If you have an Authenticator configured, then the Authenticator's login() method will be called to log this user into your underlying application framework.
- At this point, the request is either authenticated completely or there was some kind of error along the way. The framework now sets about proceeding or handling exception cases.
If the user is authenticated and there haven't been any errors, then next() is called.
If there have been errors, the section below on Filter Error Handling comes into play:
Filter Error Handling
Filter errors are pretty common. What the filter regards as errors is pretty broad. Basically anything the filter isn't sure what to do about is regarded as an error and you will have a chance to specify how to handle those cases.
The following configuration options come into play:
failureRedirectadapterFailureRedirectadapterFailureHandlerautoRegisterregistrationRedirectautoLoginloginRedirectloginHandler
Here are some scenarios to consider:
Scenario: No User
If the filter can't determine who the user is, we can control what it does next. This may be the result of the request not containing any user identifying information or may be the result of the user identifying information being expired or malformed or otherwise meaningless.
If autoLogin is set to true, then browser will redirect to /auth/{strategyId}.
If loginRedirect is set to a URL, then the browser will redirect to that URL. This can be an external URL such as your own login form. The URL will have the requested_url parameter appended to it containing the URL that was originally requested so that you may redirect back once you've logged in the user.
A login redirect is practical for cases where an external Identity Provider (such as Azure ADFS or Keycloak) host the actual form for login. Once that login completes, a JWT token (or similar) might be applied to the request ahead of it arriving to the Authentication Filter. The Filter then has all that it needs so that the Adapter can parse that token and continue as intended on any future requests.
If loginHandler is provided, it supplies a function that will be invoked to handle this case. The method might look like:
loginHandler: function(req, res, next) {
    console.log("Failed to log in!");
    res.status(401).json({"error": "phooey"});
}
If failureRedirect is provided, it describes a URL that will be used as a fallback in case none of the other options are filled in. The browser will be redirected here.
Finally, if you don't supply anything, the next(err) method will be invoked. This passes the error downstream to your next middleware route. You can set up default Express error pages to handle these errors if you choose to.
The err object will contain a reason field to indicate why the error occurred. In this case, the err.reason will be set to no_authenticated_user. The err.originalUrl field will contain the URL of the resource that the invoker was attempting to access.
Scenario: No Cloud CMS User
If the filter verifies the user but cannot find a matching Cloud CMS user within a Cloud CMS domain (and autoRegister is turned off), then we must tell it what to do.
We can use the registrationRedirect setting to tell the system about the location of a registration form that can be used to complete the creation of a Cloud CMS user. The idea is that you can give your users a form that says "welcome Joe, we found you and know about you but we just need you to click OK to create your Cloud CMS user account".
There are times you may want to do this. These are times when autoRegister isn't what you want. You may want to collect some additional information. Or you may even want the redirected route to be automatic and seamless but just need a place to plug in some additional logic.
At any rate, you can use the registrationRedirect setting to specify the route for redirection. This requires a req.session to be in place.
The system will set the following variables onto the session:
req.session.registration_strategy_id
req.session.registration_user_object
req.session.registration_user_identifier
req.session.registration_token
req.session.registration_refresh_token
And will then redirect. You can then use these session variables to pre-populate the form. This makes it easy for your end users to make slight tweaks and click OK.
If no redirects are specified, the next(err) method will be invoked. This passes teh error downstream to your next middleware route. You can set up default Express error pages to handle these errors if you choose to.
The err object will contain a reason field to indicate why the error occurred. In this case, the err.reason will be set to no_user.
Scenario: Adapter Failure
There are all kinds of reasons why an Adapter might fail. For example, an adapter might try to decode an encrypted cookie and then melt down with a funky encryption error that no one saw coming.
Hopefully, it handles it gracefully, but if it doesn't, you can specify adapterFailureRedirect to provide a URL that should be redirected to elegantly handle this unexpected case.
You can also supply a adapterFailureHandler function to handle this manually. The method might look like:
adapterFailureHandler: function(req, res, next, err) {
    console.log("Adapter failed!");
    console.log(err);
    res.status(401).json({"error": "gadzooks"});
}
Finally, if you don't supply anything, the next(err) method will be invoked. This passes the error downstream to your next middleware route. You can set up default Express error pages to handle these errors if you choose to.
The err object will contain a reason field to indicate why the error occurred. In this case, the err.reason will be set to adapter_failure.
Scenario: General Failure
There are two fallback scenarios in case nothing else works.
First, you can specify the failureRedirect setting to supply a URL that will get redirected to in case a problem occurs.
Finally, if nothing else, the next(err) method will be invoked. This passes the error downstream to your next middleware route. You can set up default Express error pages to handle these errors if you choose to.
The err object will contain a reason field to indicate why the error occurred. In this case, the err.reason will be set to internal_error.
Authentication Login Flow
To initialize an authentication flow, you simply need to redirect the browser to the following URL:
/auth/{providerId}
This will tell the Authentication Provider to initialize a login flow. This typically involves a redirect to an Identity Provider's login form. The user then fills in that form and successfully authenticates. They are then redirected back to your application at the following URL:
/auth/{providerId}/callback
An authcode is sent back and used to acquire the user's profile. The user is then authenticated to the framework.
To log out, you can redirect the user to:
/auth/{providerId}/logout
Sample Configuration: Facebook
Suppose we want users to be able to log in via Facebook and have a Cloud CMS user get automatically created and loaded onto the request for any downstream routes.
We might configure an Authentication Strategy like this:
{
    "auth": {
        "adapters": {
            "foo": {
                "type": "default",
                "config": {
                    "cookie": "FACEBOOK_TOKEN"
                }
            }
        },
        "providers": {
            "bar": {
                "type": "facebook",
                "config": {
                    "appId": "{Facebook App ID}",
                    "appSecret": "{Facebook App Secret}"
                }
            }
        },
        "strategies": {
            "mystrategy": {
                "adapter": "foo",
                "provider": "bar",
                "autoRegister": true
            }
        }
    }
}
The filter above interprets the incoming requesting using the given adapter and then interacts with the specified provider to figure out whether the user is trusted, who they are and to load their profile. The rest relies on the provider's configuration for user synchronization, Cloud CMS authentication and so on.
You can now point users to /auth/mystrategy and they'll get redirected to Facebook. Once they log in, they'll get redirected back to /auth/mystrategy/callback and the system will auto-create their user in Cloud CMS (if they don't already exist) because the autoRegister setting is true.
Suppose now that we want to have this kind of thing automatically happen whenever someone goes to /documents. Someone might click around on the site but when they go to /documents, we want to make sure they're logged in and that they have an account.
We can protect the /documents route using a filter, like this:
var auth = require("cloudcms-server/middleware/authentication/authentication");
server.routes(function(app, callback) {
    var myFilter = auth.filter("mystrategy");
    app.get("/documents", myFilter, function(req, res) {
        res.render("documents, {});
    });
});
You may also wish for your application to be protected globally which is to say that all routes should be protected by the authentication filter. Instead of specifying one route at a time, you can do something like this:
var auth = require("cloudcms-server/middleware/authentication/authentication");
server.routes(function(app, callback) {

    var myFilter = auth.filter("mystrategy");
    app.use("*", myFilter);

    app.get("/documents", function(req, res) {
        res.render("documents, {});
    });
});
Authentication Filters - Request Variables
When a filter completes its handshake, it will have loaded a number of useful variables onto the request. These are shown here:
req.gitana_user- the Cloud CMS user objectreq.gitana_user_connection- Cloud CMS driver instance connected as the authenticated Cloud CMS userreq.gitana_user_ticket- the ticket for connecting as this user to Cloud CMSreq.gitana_user_access_token- the OAuth 2.0 access token for connecting as this user to Cloud CMSreq.identity_properties- identity properties determined about the current user
Building your own Providers, Adapters and Authenticators
Building your own Authentication Providers, Adapters and Authenticators is pretty easy. We've put together some starting points here:
SDK
The Cloud CMS SDK provides examples of these service providers in action.
Please download the SDK to inspect the code and see how these are used in action.
Specifically, you will find examples here: https://github.com/gitana/sdk/tree/master/appserver/auth
These examples demonstrate using a Local Authentication Provider, JWT and Session state persistence and Facebook.
Docker
In addition, a number of examples are provided as Docker kits for on-premise users. These include pre-integrated examples of SSO against Keycloak, Facebook, Twitter and LinkedIn.