Okta
This page provides information on how to configure Cloud CMS Single Sign On (SSO) for Okta and SAML 2.0.
Cloud CMS provides Single Sign On (SSO) Enterprise support for a variety of Identity Providers using SAML 2.0 and/or JWT. For more information, see Cloud CMS Single Sign On (SSO).
You can learn more about Okta here:
https://www.okta.com
Set up Okta
In this section, we'll set up Single Sign On with Okta.
Log into the Okta Administration Console
Login at https://{your-okta-domain}.okta.com
Then, click Admin, and go to Applications
Create an Application
Create a new Application for "Cloud CMS"
Select Add Applications from the "Shortcuts" menu on the right. And then the Create New App button.
You will see a form like this:

Select "Platform" "Web" and "Sign on Method" "SAML 2.0". Click Create
Enter Cloud CMS for "App name". This is only an example. It can be any name you like.
Click Next
You will see the following form:
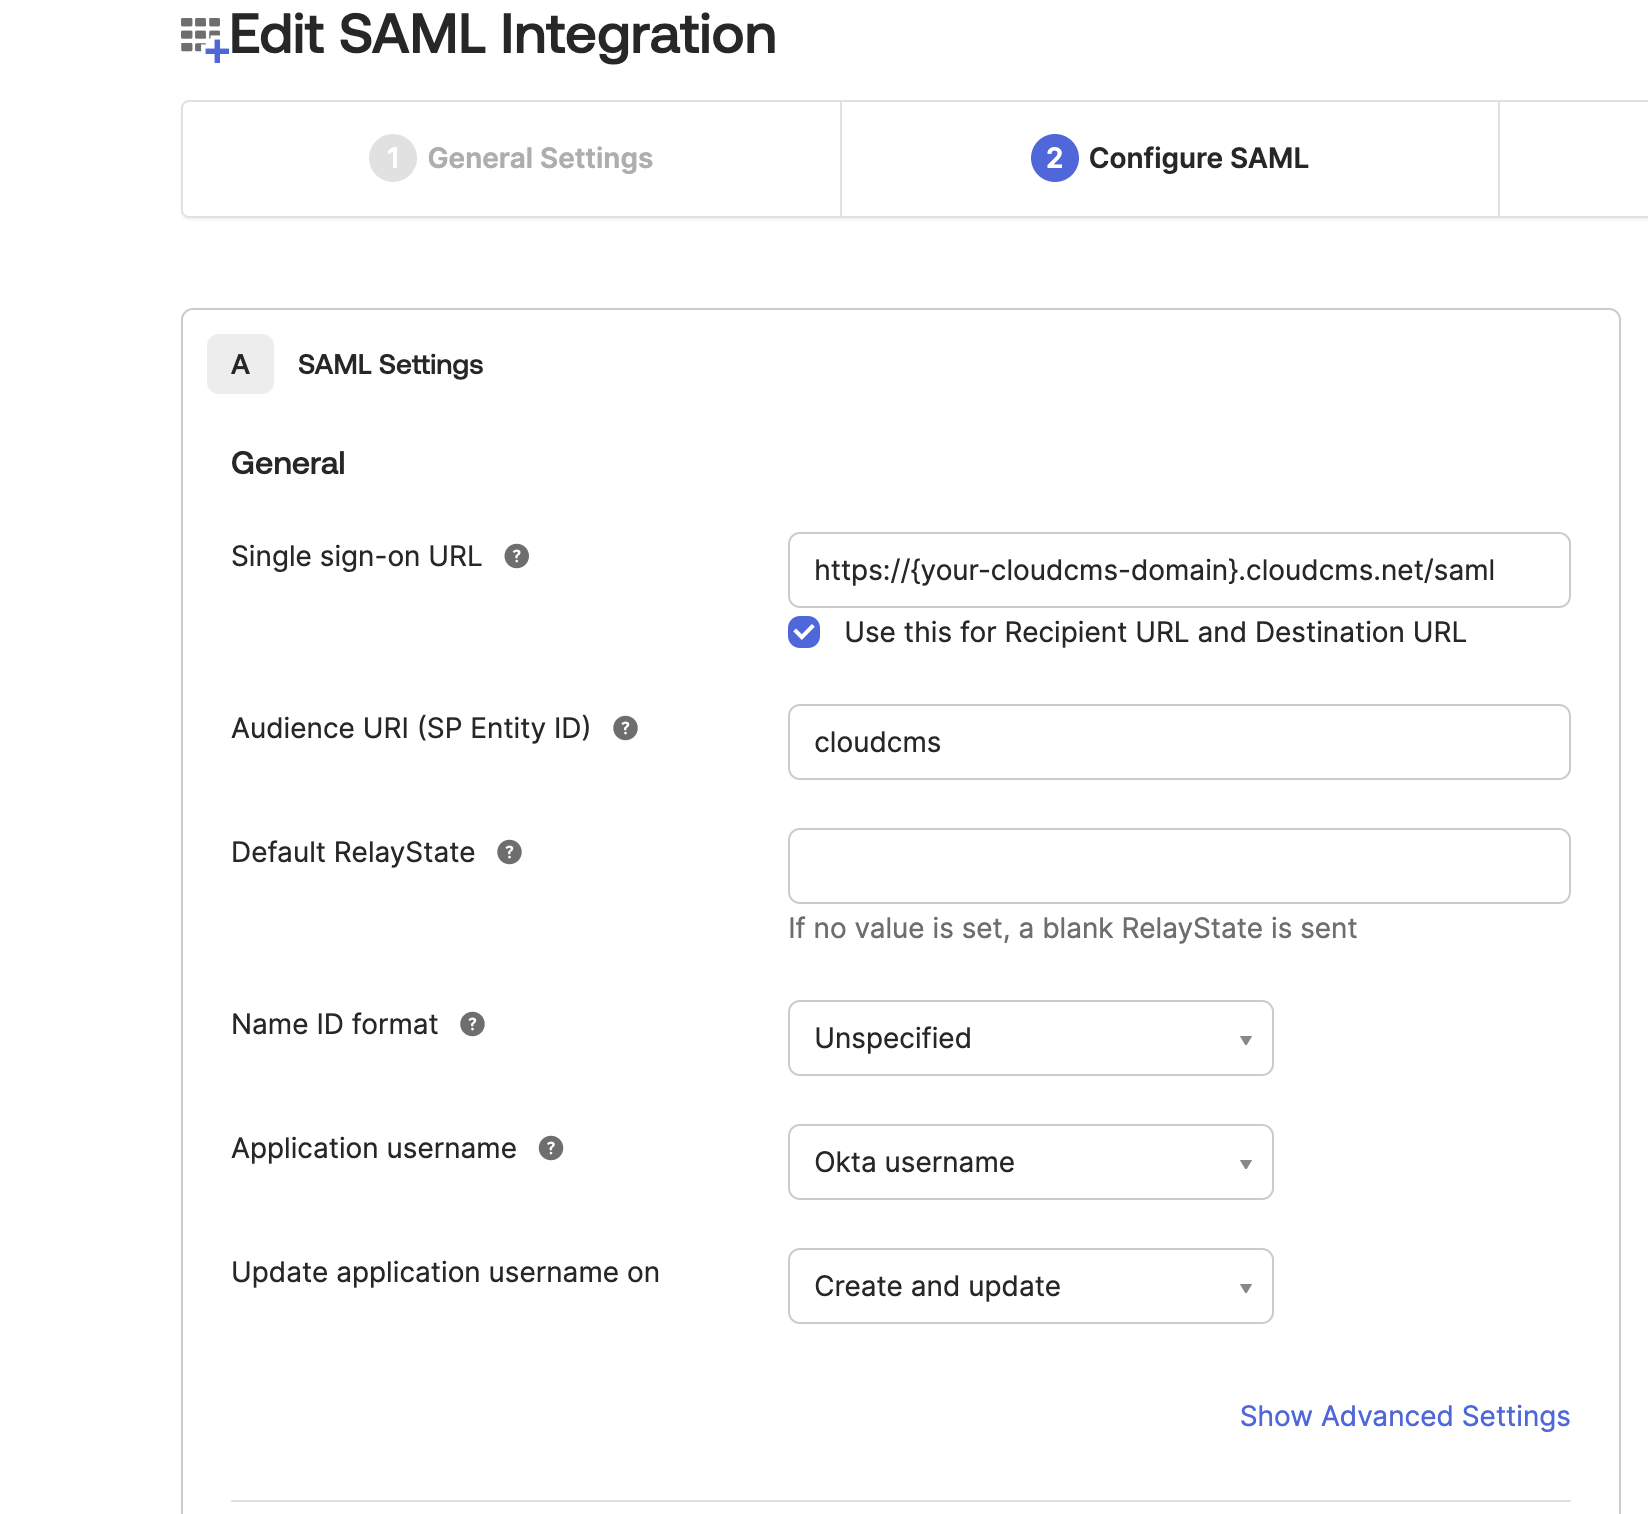
For Single sign on URL enter the Cloud CMS Assertion Consumer Service URL: https://{your-cloudcms-domain}.cloudcms.net/saml
Enter cloudcms for "Audience URI". Remember this value as it is required in the Cloud CMS SSO configuration in a future step. This value is only an example. It can be any name you like.
Click Next and Finish
From the "General" settings of the new "Application", copy the URL value under EMBED LINK. You will need this URL in the Set up Cloud CMS step below.
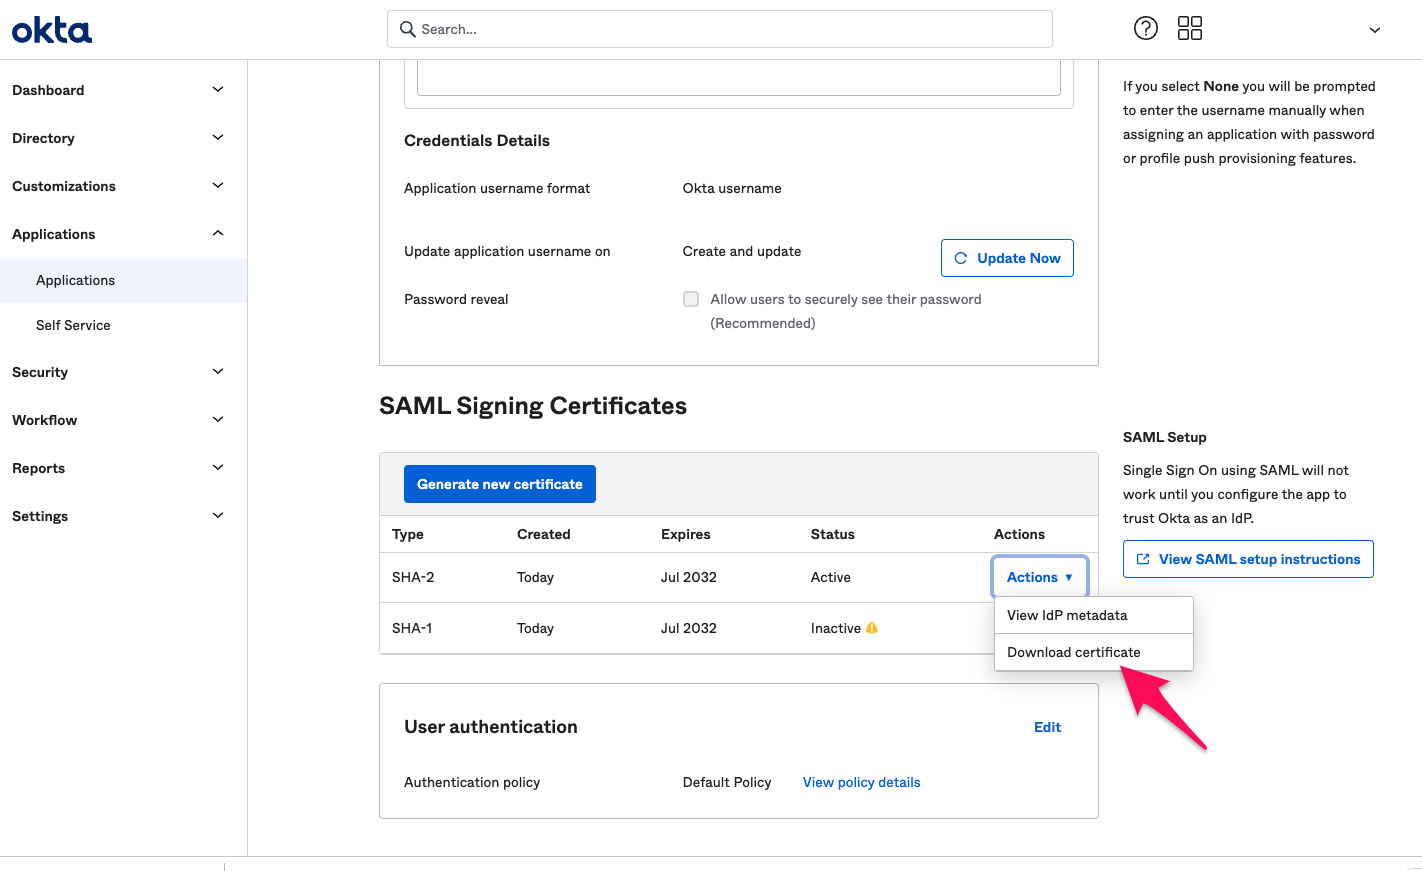
From "SAML Signing Certificates" download a certificate. Use this for the Certificate in the Set up Cloud CMS step below.
Mappings
To have custom user properties map to your Cloud CMS users, you'll want to configure the User Mappings for each property to map to a subproperty of the user object in the SAML response, like so:
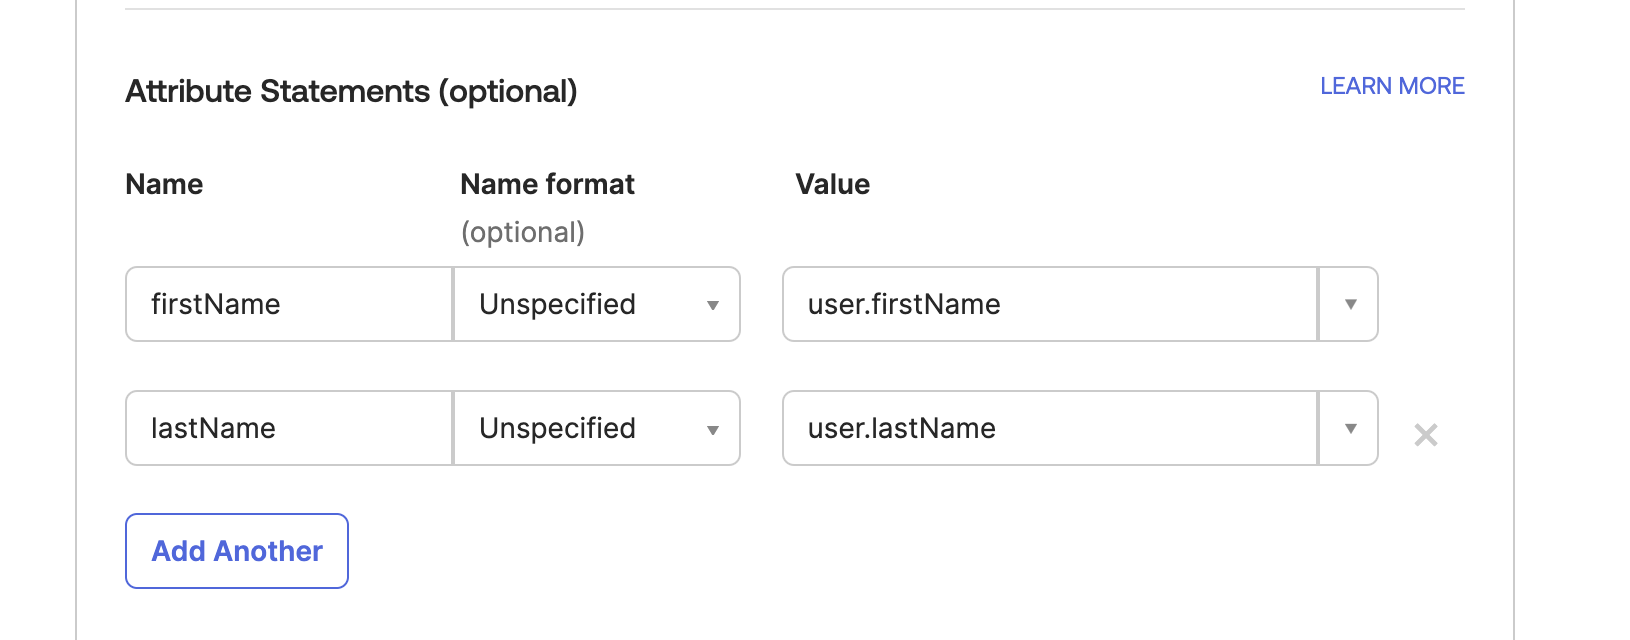
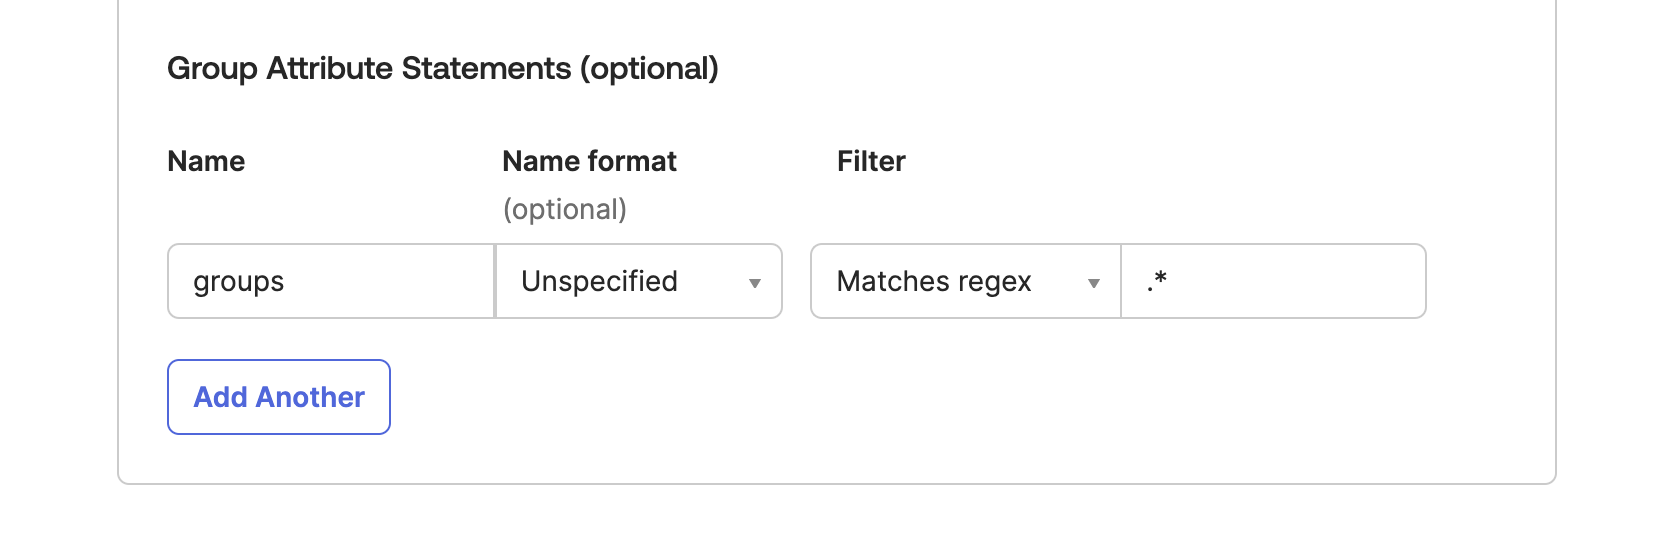
In order for Cloud CMS to map groups from your Okta users, ensure to map all relevant group ids to the groups property like this:
SAML Assertion
Once you've set up your mappings, you ought to be able to preview the SAML Assertion for your user. It should look something like this:
<?xml version="1.0" encoding="UTF-8"?>
<saml2:Assertion ID="id166645512997613619036728" IssueInstant="2025-02-26T15:24:51.016Z" Version="2.0"
    xmlns:saml2="urn:oasis:names:tc:SAML:2.0:assertion">
    <saml2:Issuer Format="urn:oasis:names:tc:SAML:2.0:nameid-format:entity">http://www.okta.com/xyz123</saml2:Issuer>
    <saml2:Subject>
        <saml2:NameID Format="urn:oasis:names:tc:SAML:1.1:nameid-format:unspecified">joesmith@company.com</saml2:NameID>
        <saml2:SubjectConfirmation Method="urn:oasis:names:tc:SAML:2.0:cm:bearer">
            <saml2:SubjectConfirmationData NotOnOrAfter="2025-02-26T15:29:51.016Z" Recipient="http://mycompany.cloudcms.net/saml"/>
        </saml2:SubjectConfirmation>
    </saml2:Subject>
    <saml2:Conditions NotBefore="2025-02-26T15:19:51.016Z" NotOnOrAfter="2025-02-26T15:29:51.016Z">
        <saml2:AudienceRestriction>
            <saml2:Audience>cloudcms</saml2:Audience>
        </saml2:AudienceRestriction>
    </saml2:Conditions>
    <saml2:AuthnStatement AuthnInstant="2025-02-26T15:07:19.996Z" SessionIndex="id1740583491014.143994899">
        <saml2:AuthnContext>
            <saml2:AuthnContextClassRef>urn:oasis:names:tc:SAML:2.0:ac:classes:PasswordProtectedTransport</saml2:AuthnContextClassRef>
        </saml2:AuthnContext>
    </saml2:AuthnStatement>
    <saml2:AttributeStatement>
        <saml2:Attribute Name="firstName" NameFormat="urn:oasis:names:tc:SAML:2.0:attrname-format:unspecified">
            <saml2:AttributeValue
                xmlns:xs="http://www.w3.org/2001/XMLSchema"
                xmlns:xsi="http://www.w3.org/2001/XMLSchema-instance" xsi:type="xs:string">Joe
            </saml2:AttributeValue>
        </saml2:Attribute>
        <saml2:Attribute Name="lastName" NameFormat="urn:oasis:names:tc:SAML:2.0:attrname-format:unspecified">
            <saml2:AttributeValue
                xmlns:xs="http://www.w3.org/2001/XMLSchema"
                xmlns:xsi="http://www.w3.org/2001/XMLSchema-instance" xsi:type="xs:string">Smith
            </saml2:AttributeValue>
        </saml2:Attribute>
        <saml2:Attribute Name="MEMBERS" NameFormat="urn:oasis:names:tc:SAML:2.0:attrname-format:unspecified">
            <saml2:AttributeValue
                xmlns:xs="http://www.w3.org/2001/XMLSchema"
                xmlns:xsi="http://www.w3.org/2001/XMLSchema-instance" xsi:type="xs:string">Everyone
            </saml2:AttributeValue>
            <saml2:AttributeValue
                xmlns:xs="http://www.w3.org/2001/XMLSchema"
                xmlns:xsi="http://www.w3.org/2001/XMLSchema-instance" xsi:type="xs:string">cheeseheads
            </saml2:AttributeValue>
        </saml2:Attribute>
    </saml2:AttributeStatement>
</saml2:Assertion>
Your own assertion may very. However, there are some important things to verify:
- The
<saml2:NameID/>entry identifies the primary key for your user. In this case, it's the email address (joesmith@company.com) of the user. If your own Okta installation uses a different primary key (such as a GUID), you may need to change the User Primary Identifier Field to an attribute value (see next steps). - The
<saml2:Attribute/>entries hold fields that are mapped from your Okta user schema to the assertion. In this case, we've mappedfirstNameandlastName. In Okta, we do this by setting the assertion fieldfirstNameto the value ofuser.firstName. Okta's expression language evaluates this and plugs in the correct value on the fly. - The
MEMBERSattribute is multi-value and provides a set of identifiers. Typically, these identifiers are used to execute user sync rules that automatically assign users to specific teams or projects.
Add a User to the App
From the Admin console, select "Directory" and "People" from the top menu.
Select a user account and click the Assign Applications button.
A list of applications is displayed. It should now include "Cloud CMS".
Click the Assign button and then Done.
Set up Cloud CMS
In a new browser window, log into the Cloud CMS user interface. Click on Manage Platform and then pick SSO on the left-hand menu.
Select SAML 2.0 from the radio button list.
And then fill out the form.
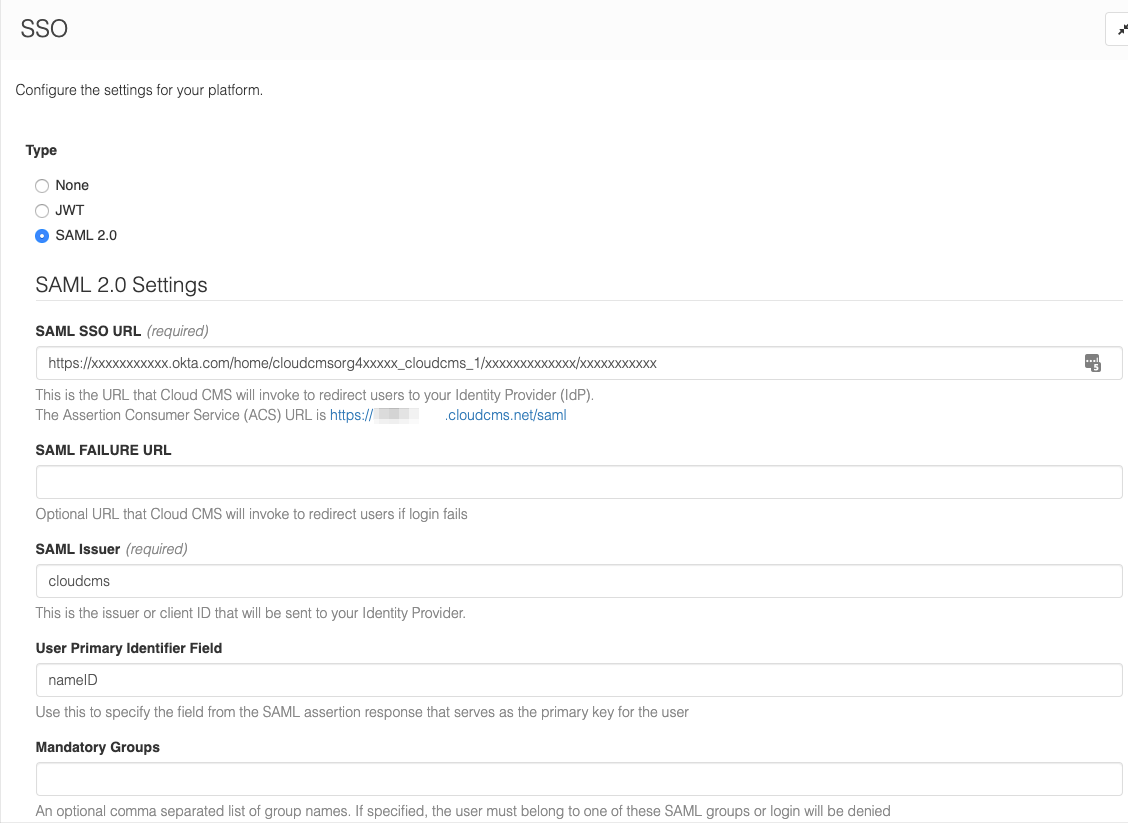
The following is required:
- The
SAML URLshould be the EMBED LINK value you copied from the Okta "Application" you created above. - The
SAML Issuershould match the Okta Application's Audience URI - Enter the PEM formatted certificate you downloaded from the Okta "Application" you created above into Certificate
Don't forget to save your changes!
User Field Mappings (optional)
Under User Field Mappings, you can set up the following:
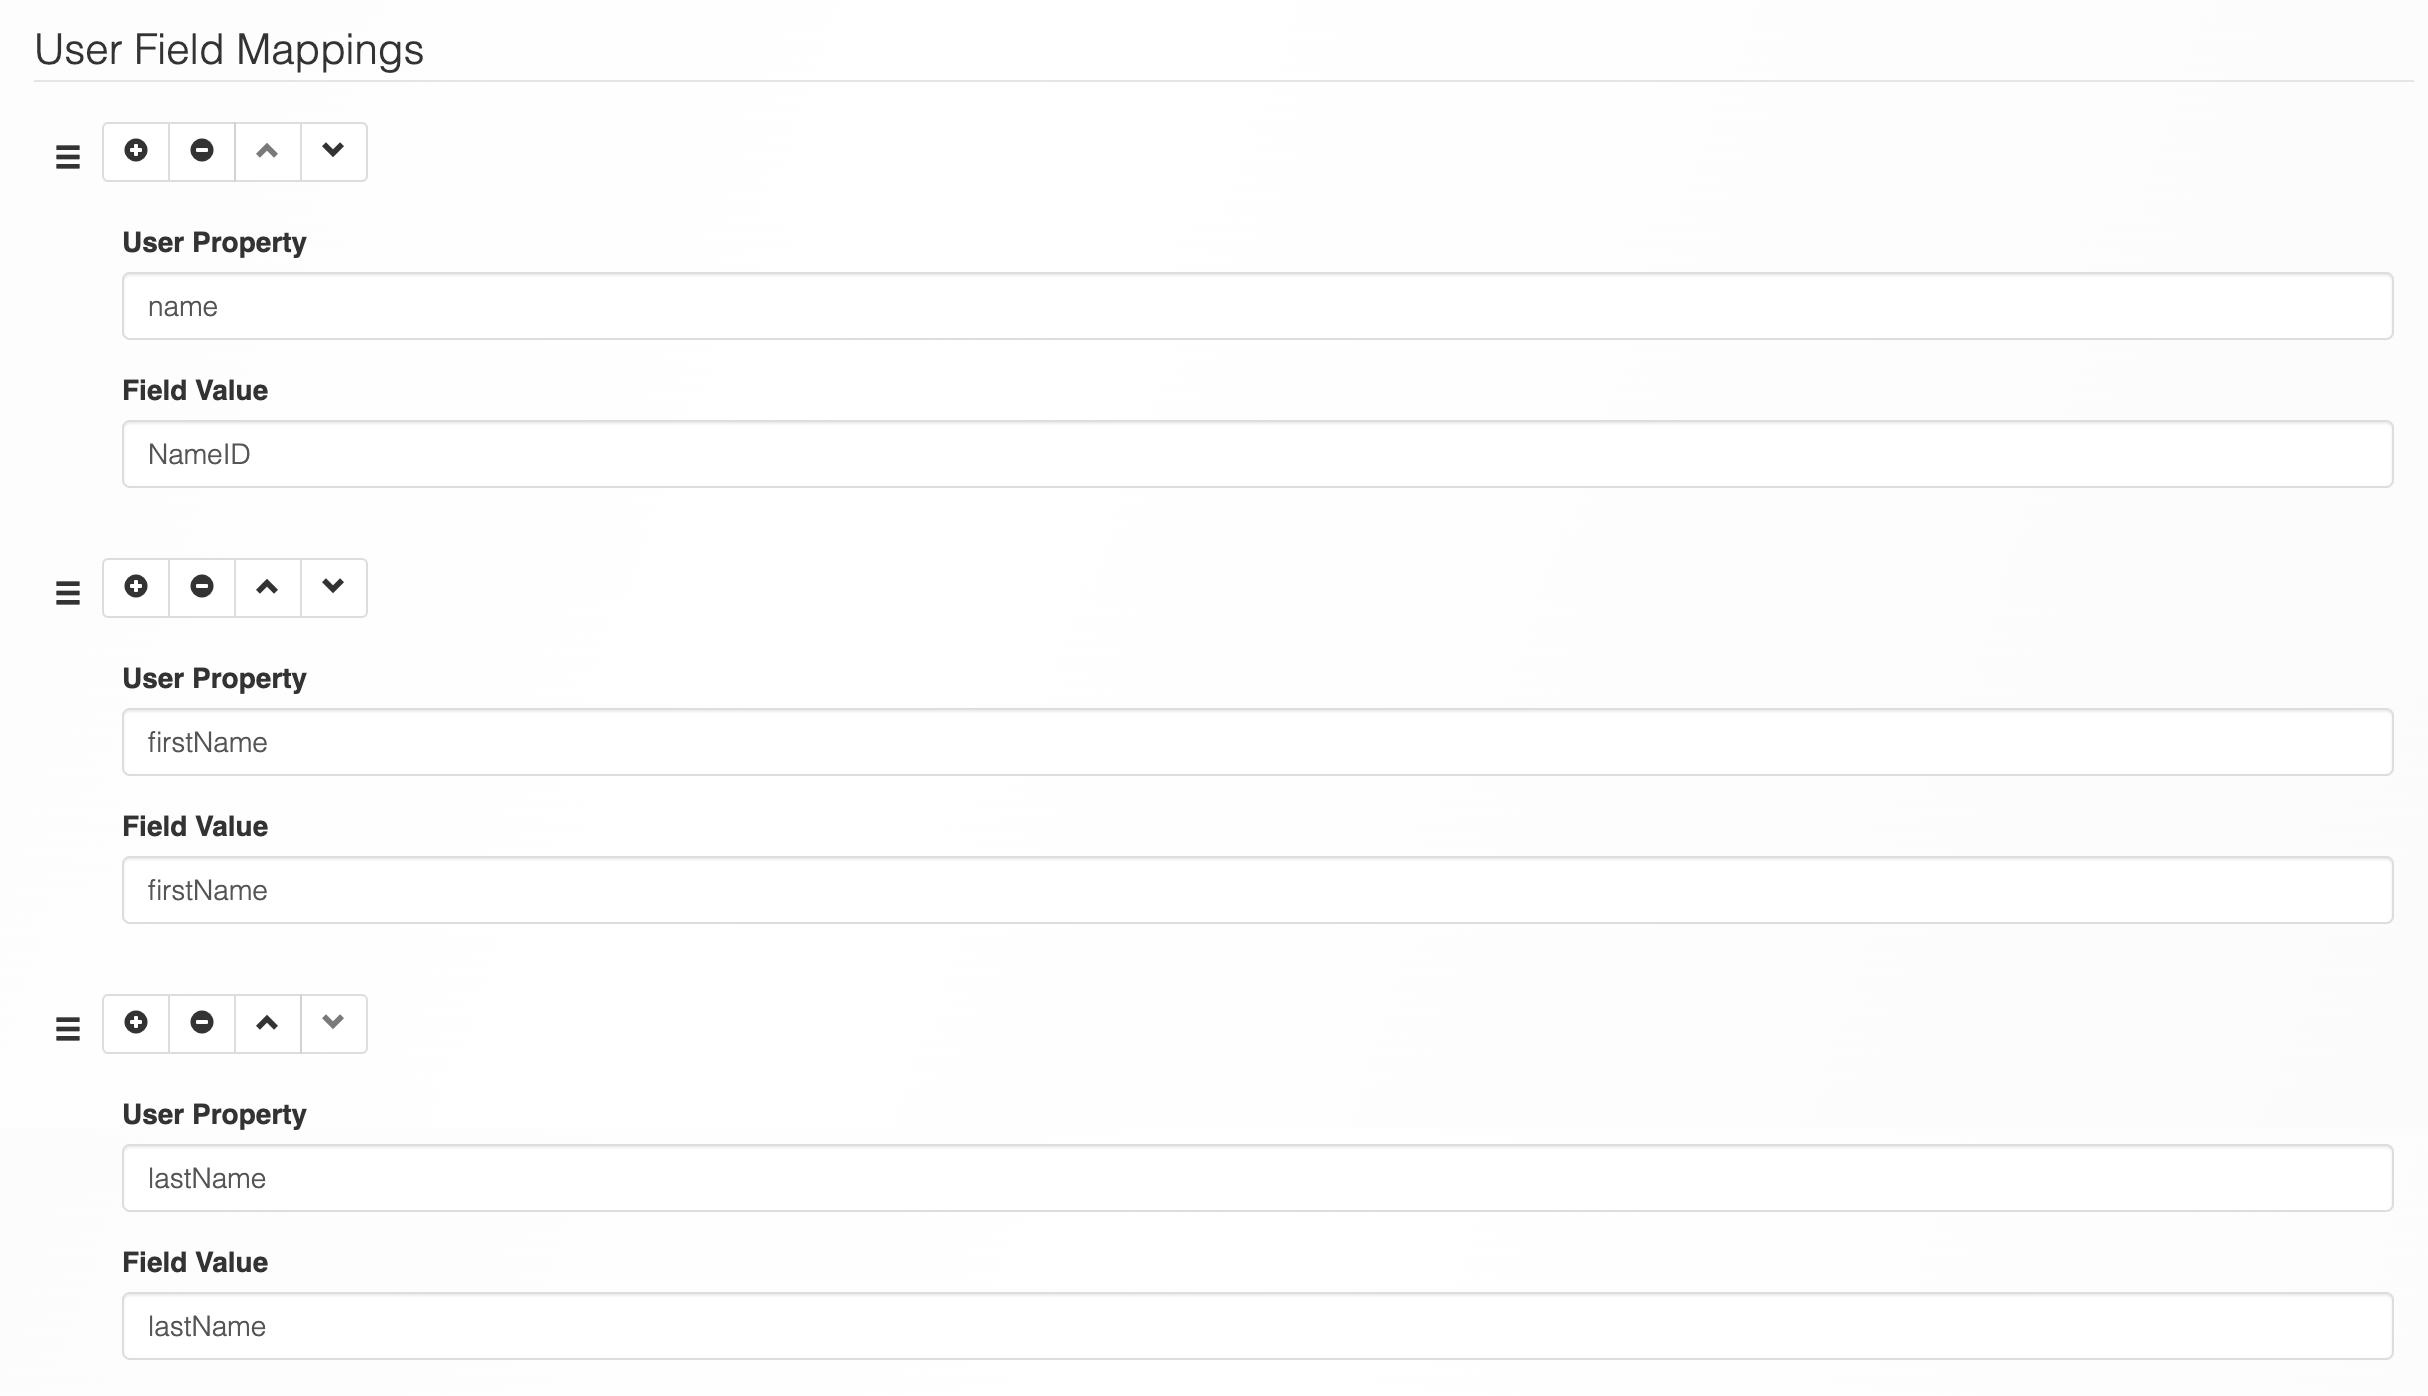
Where:
nametakes on the SAML Assertion value forNameIDfirstNametakes on the SAML Assertion attribute value forfirstNamelastNametakes on the SAML Assertion attribute value forlastName
Considering the SAML Assertion provided above, this would result in your synchronized user having a name of This will result in your synced user having a name of joesmith@company.com, a first name of Joe and a last name of Smith.
Don't forget to save your changes!
Group Mappings (optional)
Under Group Mappings, you can drive behaviors based on what groups the user belongs to. These groups are expressed in the SAML Assertion via the MEMBERS attribute. They may also be expressed within the SAML Assertion via the GROUPS attribute.
In the SAML Assertion above, Joe Smith belongs to the cheeseheads group. We can set up a mapping rule so that any users who are members of the cheeseheads group are automatically added to a platform team.
Here is an example:
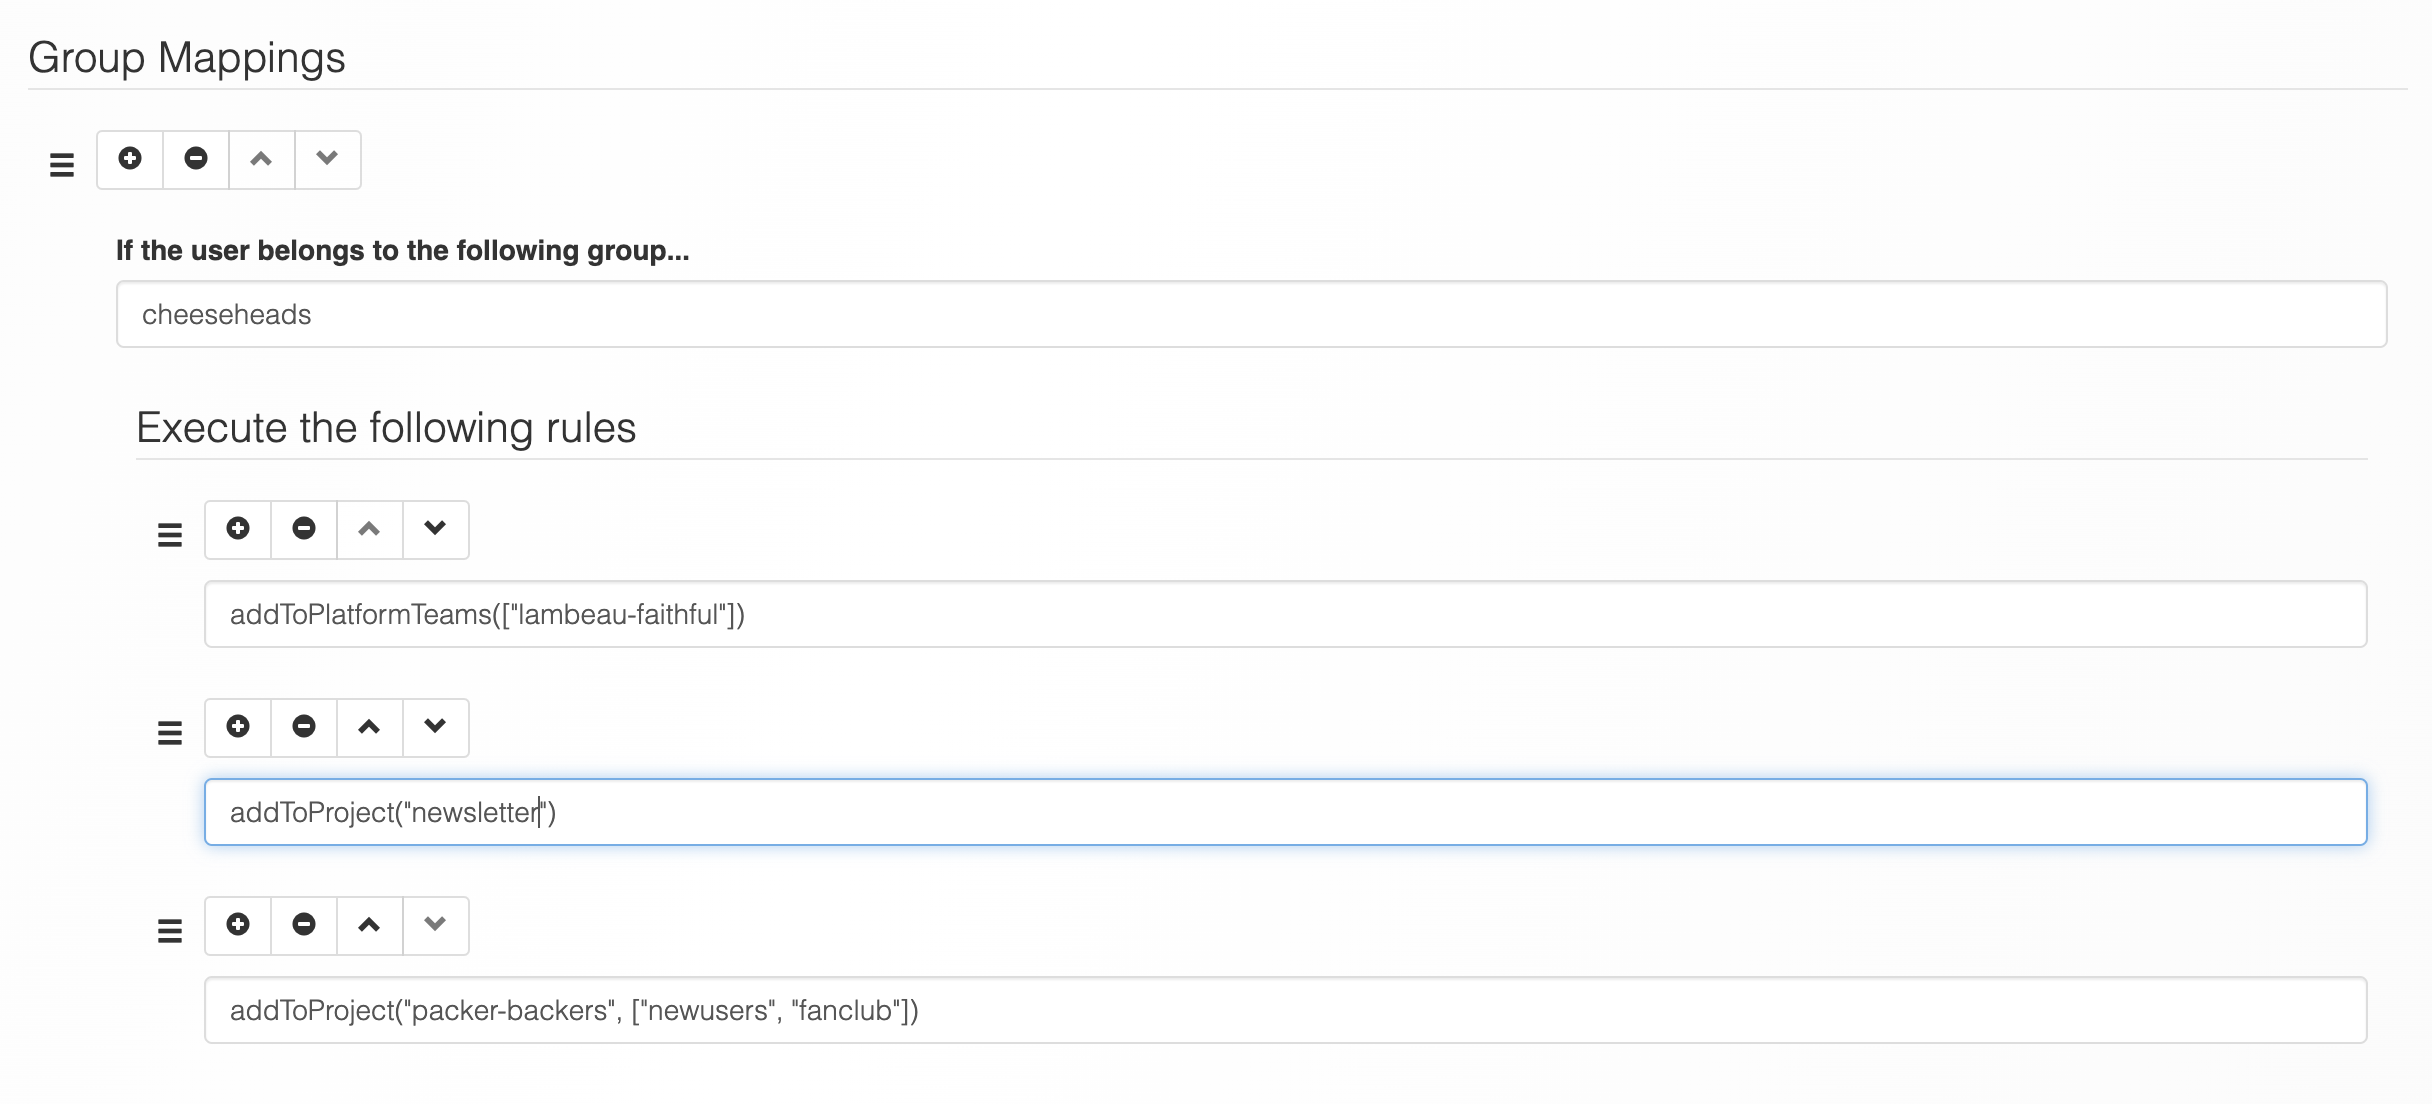
Let's see what we've done:
- Any users who belong to the
cheeseheadsgroup in the SAML Assertion will be added to the Platform Team identified by the team keylambeau-faithful. This is done by running the functionaddToPlatformTeams(["lambeau-faithful"]). - Any users who belong to the
cheeseheadsgroup in the SAML Assertion will be added to thenewsletterProject. This is done by running the functionaddToProject("newsletter"). - Any users who belong to the
cheeseheadsgroup in the SAML Assertion will be added to thepacker-backersProject. They will also be added to thenewusersandfanclubteams for that Project. This is done by running the functionaddToProject"packer-backers", ["newusers", "fanclub"]).
You should be able to set up similar rules to automatically have your users added to specific Projects and Teams based on their IdP-managed profile.
Don't forget to save your changes!
Verify it works
You can now verify that Cloud CMS is configured to use SAML 2.0:
- Log out of your current Cloud CMS account
- Log back in
- While Logging in again, you will be re-directed to Okta
- Log into Okta with your username and password.
- If the credentials match, you will be redirected back to Cloud CMS.
- Cloud CMS will automatically log you in and create your user if it doesn't yet exist.