Docker Installation
The Cloud CMS Application Server is additionally provided as a Docker image. With Docker, you can launch this image within its own container running on Linux, Mac OS or Windows. The container can be managed, brought online and shutdown at any time.
Docker
To get started, you will need to familiarize yourself with Docker. Install Docker onto your operating system and become familiar with the command line tools.
Git
You will also need to be familiar with Git. The source for the Cloud CMS Application Server is available on GitHub. Please visit http://www.github.com to sign up for an account and get started with Git.
Download
First create a directory where you will do your work. Go into that directory and then run the following from a command prompt:
git clone https://github.com/gitana/cloudcms-application-server.git
This may take a little bit of time depending on your internet connection. When it finishes, do the following:
cd cloudcms-application-server/docker
Configuration
You need to tell the Cloud CMS Application Server about your Cloud CMS account. Specifically, you will need to go into your Cloud CMS tenant's user interface and create a Project. A Project is where you store all of your content.
Within your Project, create an Application. The Application will come with a default deployment and a default set of API Keys. You can access these API Keys from the "API Keys" navigation item on the left-hand side of the page.
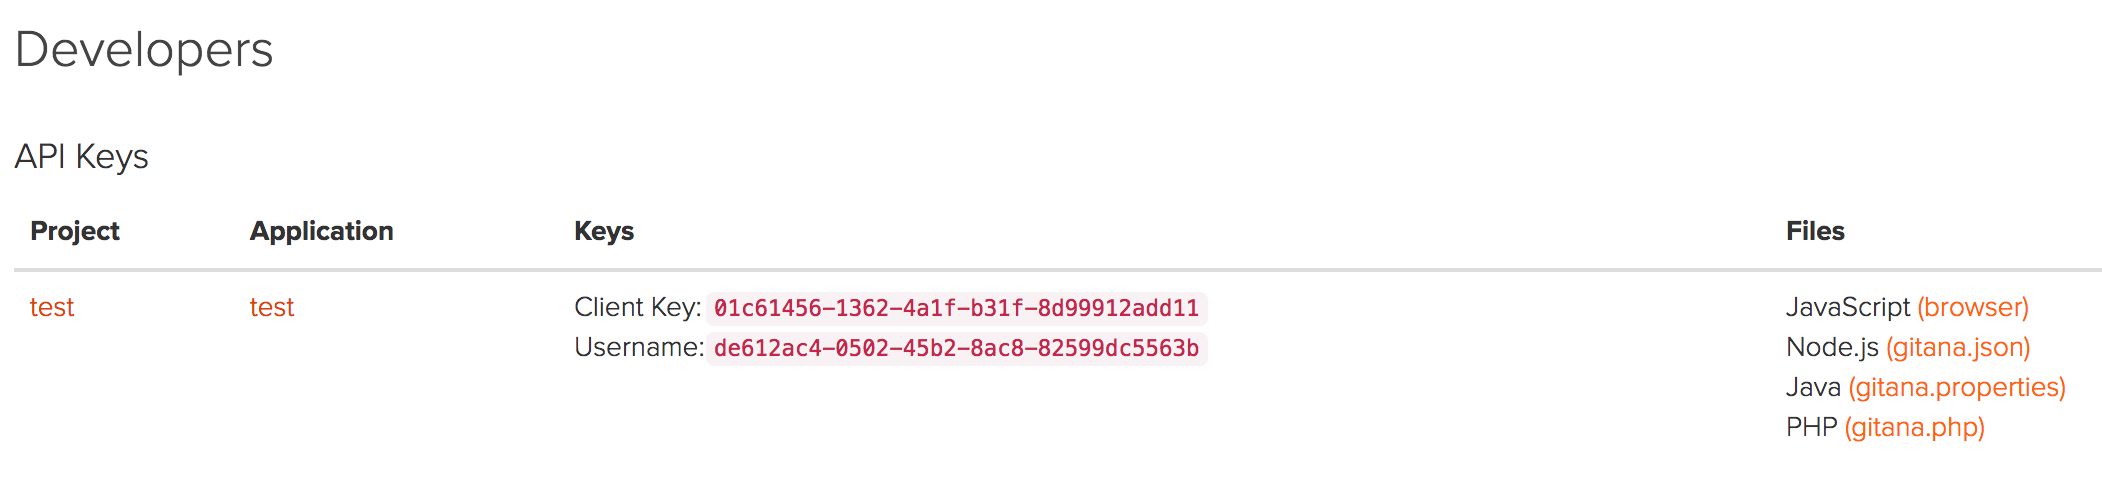
Click on gitana.json to view the keys.
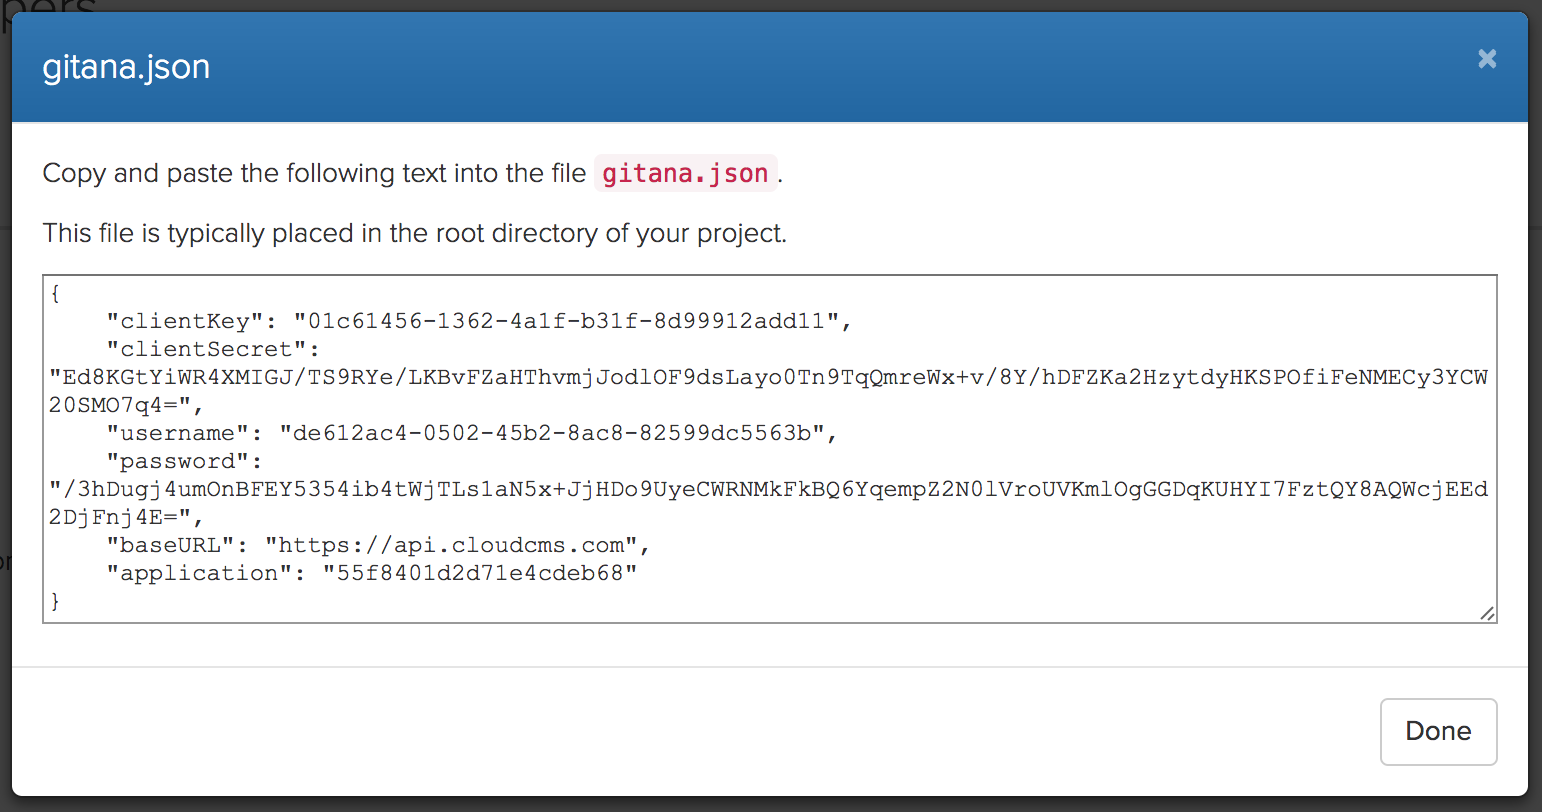
Copy and paste the contents to a file called gitana.json in the current directory. The gitana.json file should sit alongside the Dockerfile file.
Your gitana.json file provides the API keys required for the Application Server to connect to your Cloud CMS tenant. These consists of client keys (clientSecret and clientKey) and also the keys for the authentication grant (username and password). Your gitana.json file will also contain an application property which is the ID of the application instance that will be connected to.
Build and Run
Build your image like this:
docker build . -t cloudcms_appserver
And then run it like this:
docker run -ti -p 3000:80 --env-file ./app.env cloudcms_appserver
This maps the Cloud CMS Application Server running inside of the Docker host (on port 80) to port 3000 on your local machine.
When the Cloud CMS Application Server starts, it will find the gitana.json file and connect to your tenant. You can then hit the web site like this:
http://localhost:3000
For example, you might request the following asset using URL Addressability:
http://localhost:3000/static/path/System/Theme/logo.png
Connecting to Cloud CMS (Docker)
If you're running Cloud CMS locally on Docker, there are some extra steps you will need to take in order to make sure that your newly instantiated Application Server container can "see" the Cloud CMS containers.
There are several ways to do this but one easy way is to put them on the same network.
Use the following command:
docker network ls
To find the network that you've defined in your Cloud CMS docker-compose.yml file. For example, if you're running the "quickstart" kit, the network name may be quickstart_cloudcms.
We'll use this to start up the Application Server on the same virtual network as the Cloud CMS containers.
As such, the Application Server will be able to refer to the API using the naming convention you've defined in your docker-compose.yml. Typically this is api.
Edit your gitana.json file to look like this:
"baseURL": "http://api:8080"
In addition, you should set the following environment variables in the app.env file ahead of building your application server:
GITANA_PROXY_HOST=api
GITANA_PROXY_PORT=8080
GITANA_PROXY_SCHEME=http
Then make sure to build your Application Server image. Use the --force-rm option to rebuild from scratch in case you did so previously. Like this:
docker build . -t cloudcms_appserver --force-rm
And now run your Application Server container by attaching it to the quickstart_cloudcms network. The command should look like this:
docker run -ti -p 3000:80 --network quickstart_cloudcms --env-file ./app.env cloudcms_appserver
Once you do this, your Application Server container will come online and will be running alongside the other four containers in the same network space. These five combined containers can all see each other by their respective networking names. These names are defined within docker-compose.yml and as cloudcms_appserver above, respectively, though you are free to change them as you wish.
The Application Server communicates with the API via the Docker network, entirely between the containers. Traffic never routes out through your network interface to localhost.
In production scenarios, you may not wish to run these containers on the same bridged virtual network. Docker offers many other options here. We suggest reading through the official Docker documentation on networking which is available here: