---
title: "Okta"
description: "Optimize your Okta SSO for Cloud CMS with easy setup and detailed SAML 2.0 configuration instructions. (Gitana 4.0)"
product: "Gitana"
version: "4.0"
url: "/documentation/gitana/4.0/engine/sso/okta"
---

# Okta
This page provides information on how to configure Cloud CMS Single Sign On (SSO) for Okta and SAML 2.0.
Cloud CMS provides Single Sign On (SSO) Enterprise support for a variety of Identity Providers using SAML 2.0 and/or JWT. For more information, see [Cloud CMS Single Sign On (SSO)](/documentation/gitana/4.0/engine/sso/overview.md).
You can learn more about Okta here:
```
https://www.okta.com
```
## Set up Okta
In this section, we'll set up Single Sign On with Okta.
### Log into the Okta Administration Console
```
Login at https://{your-okta-domain}.okta.com
```
Then, click **Admin**, and go to **Applications**
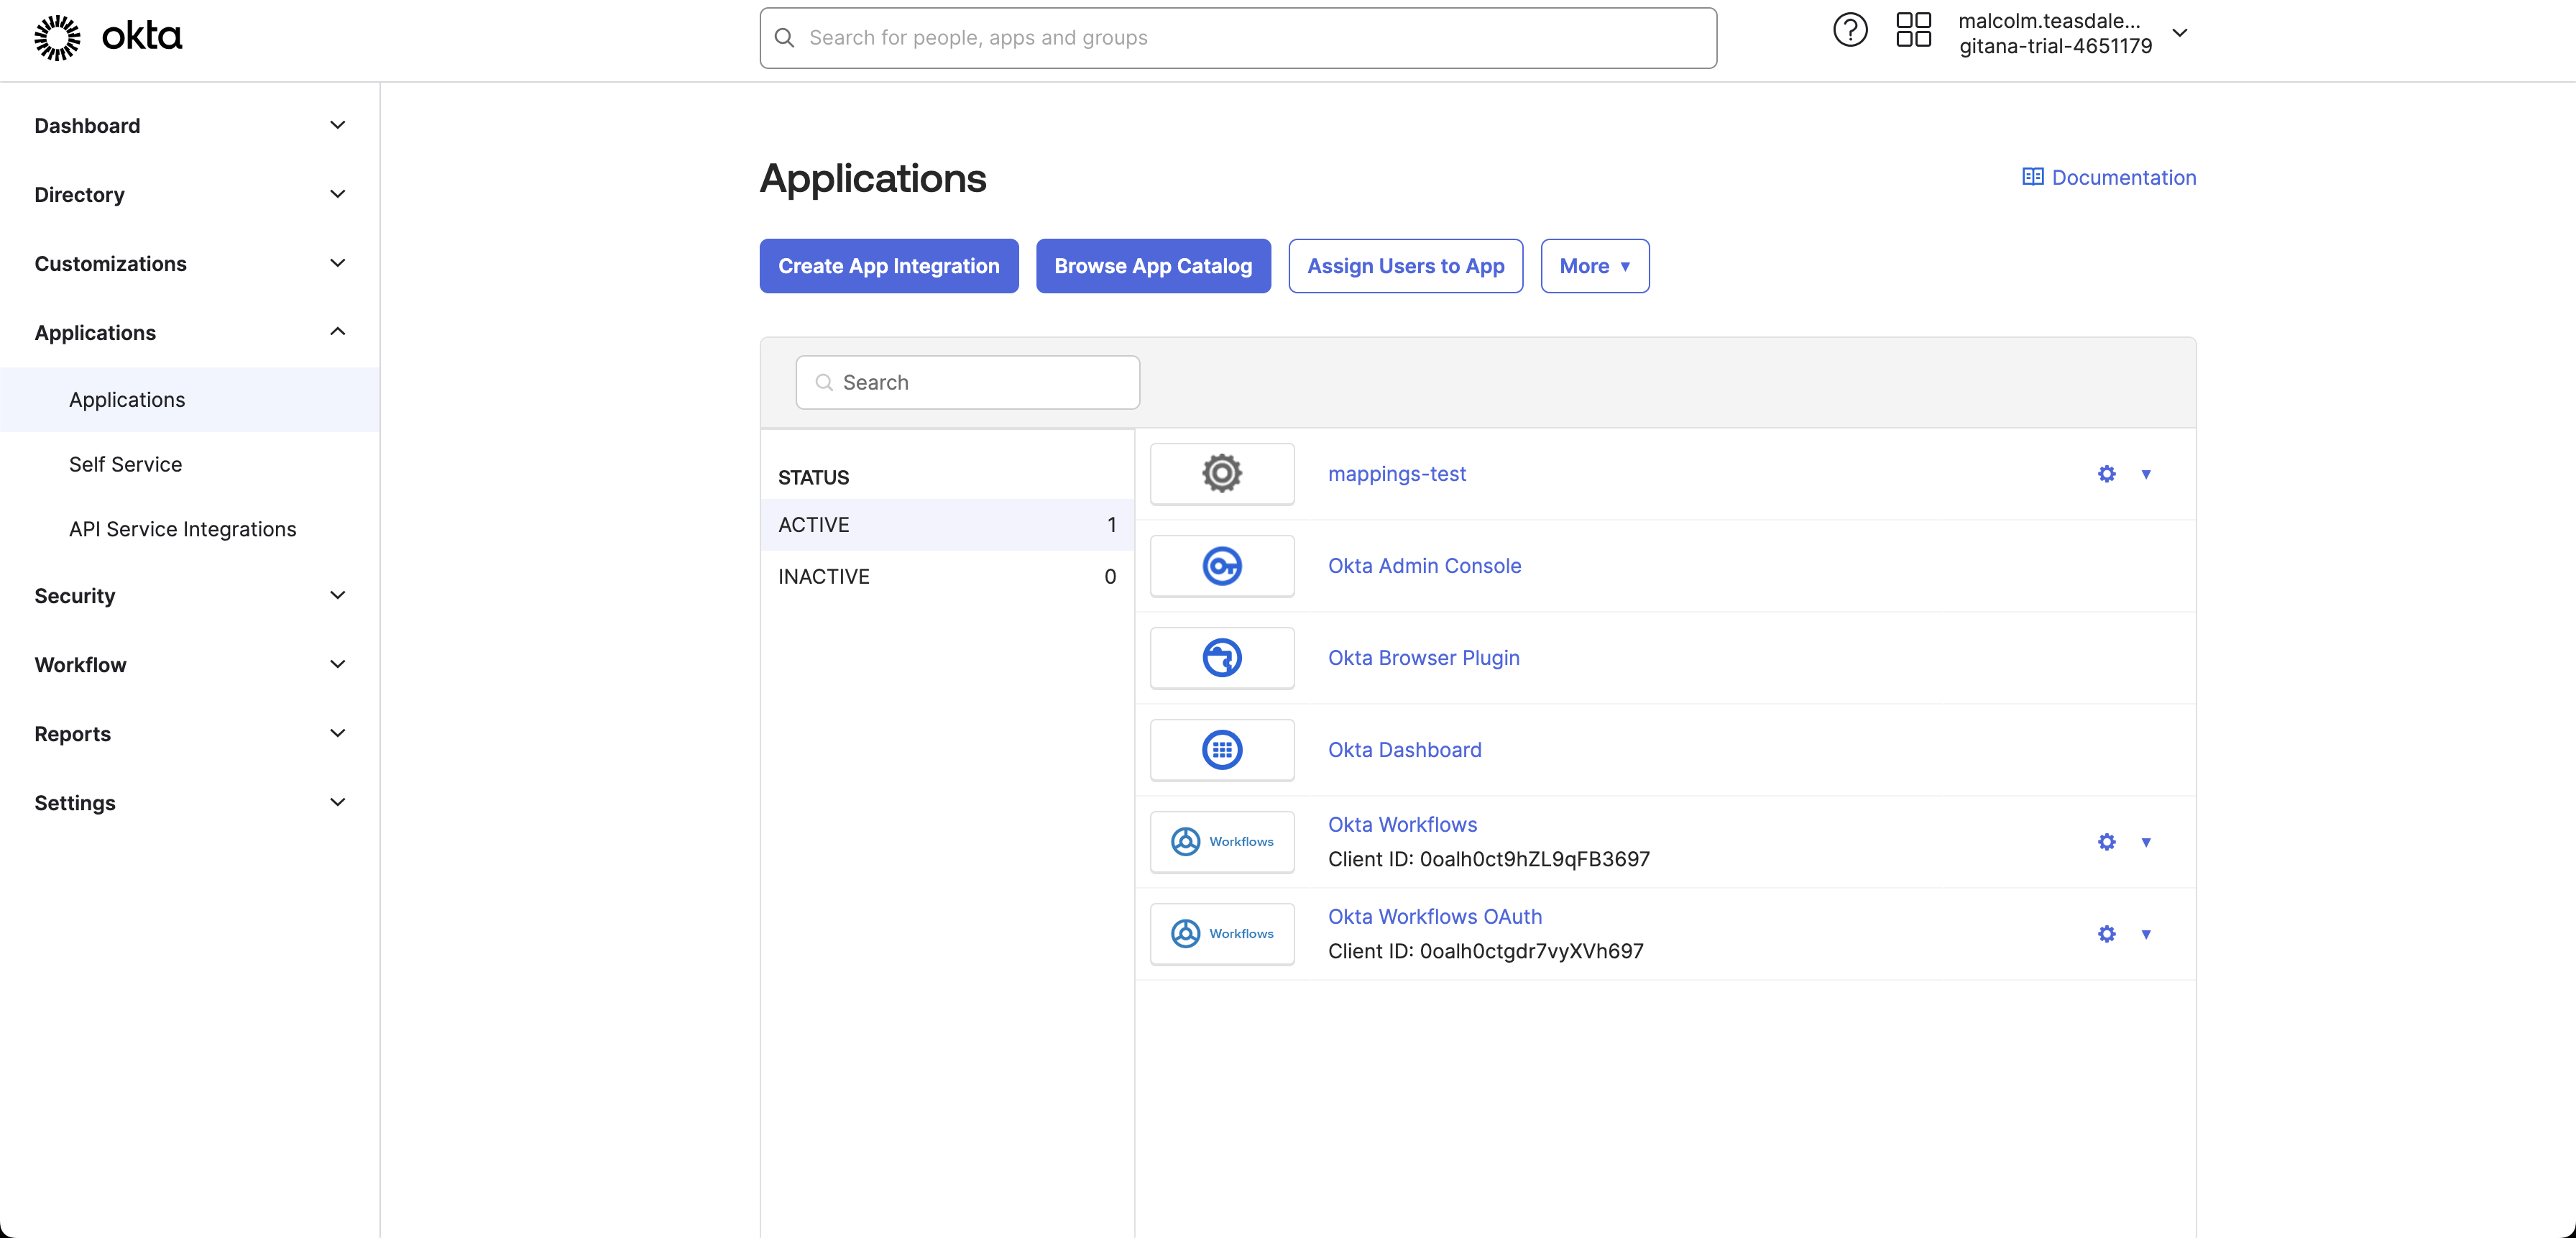
### Create an Application
Create a new Application for "Cloud CMS"
Select **Add Applications** from the "Shortcuts" menu on the right. And then the **Create New App** button.
You will see a form like this:
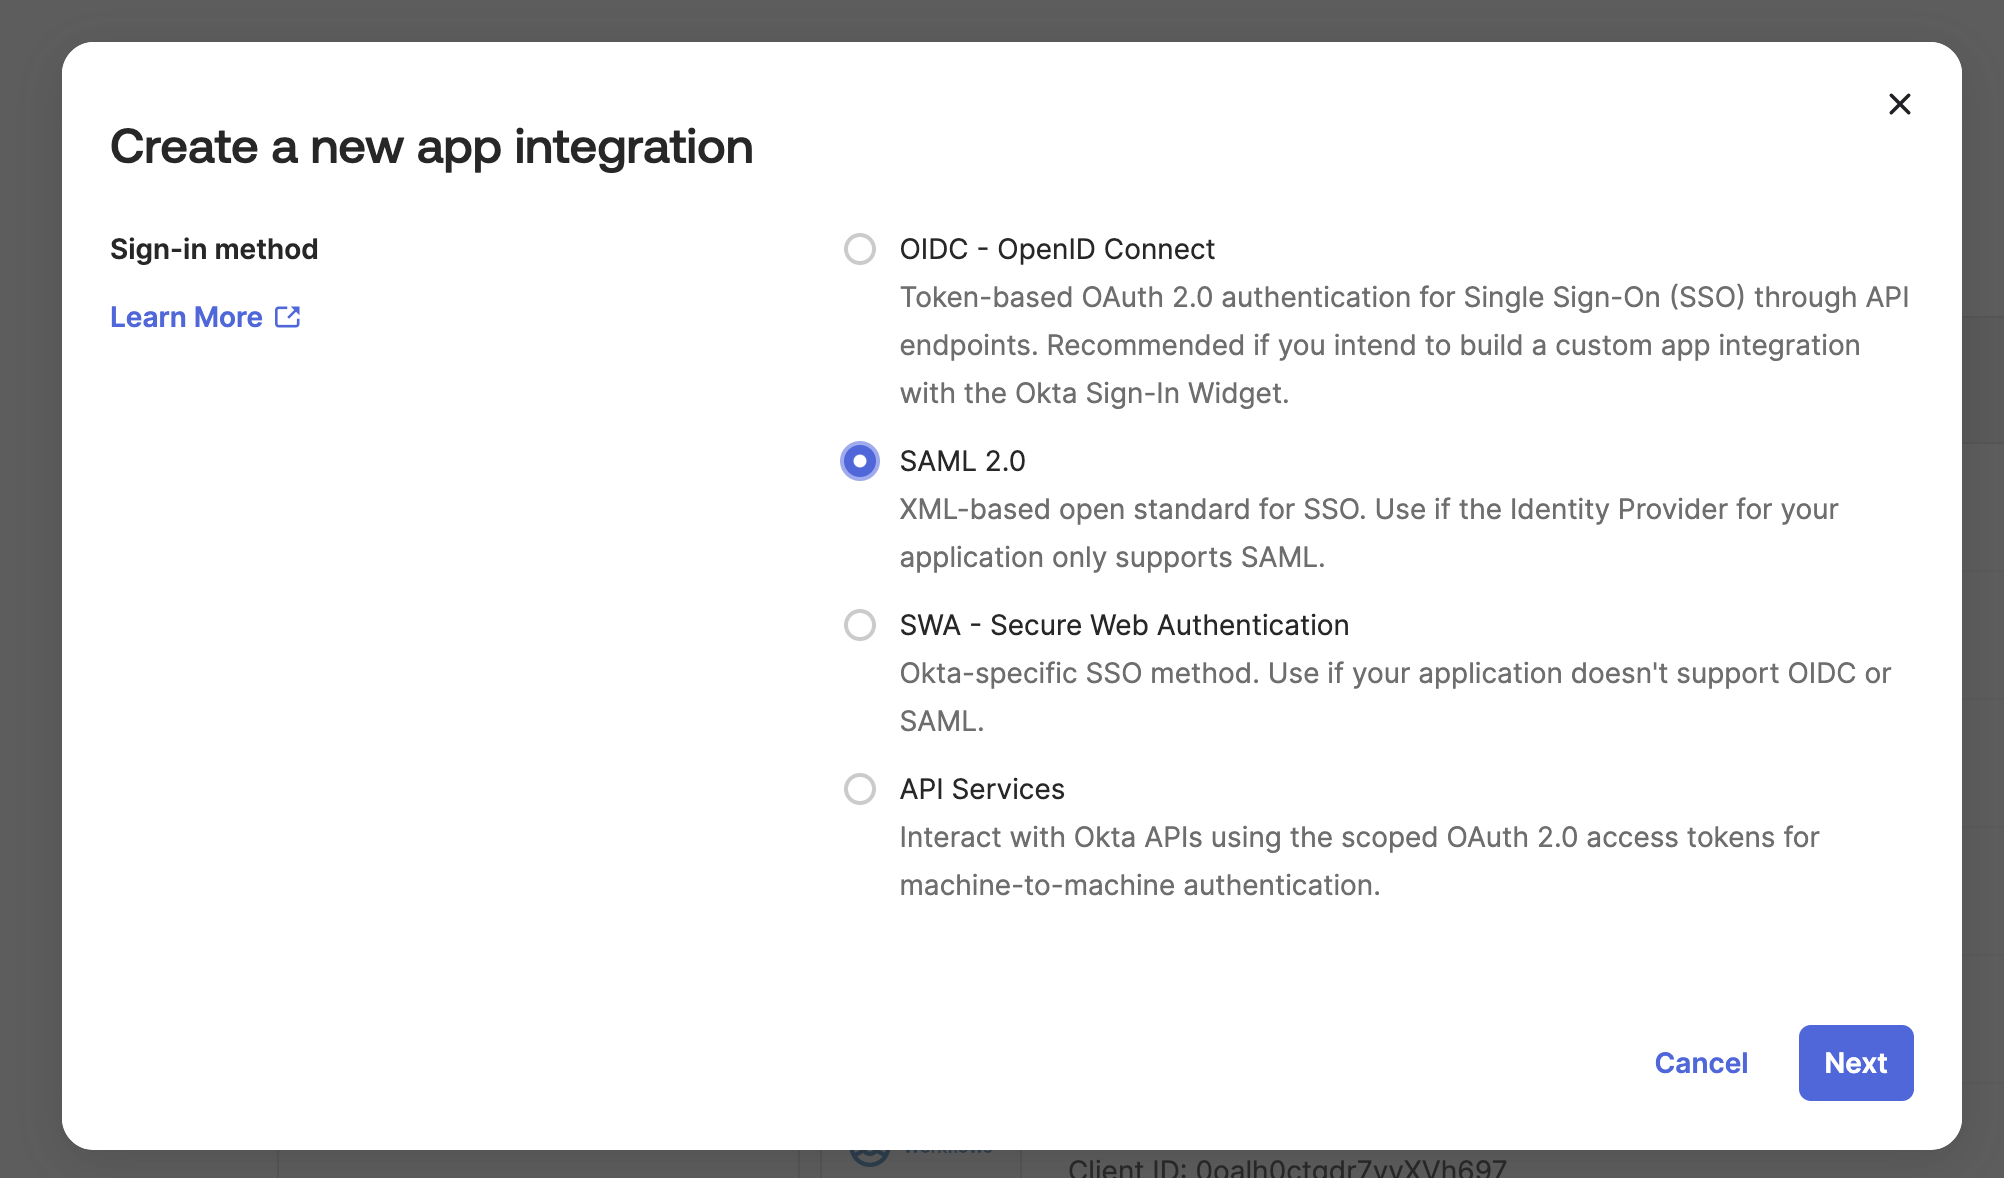
Select "Platform" "Web" and "Sign on Method" "SAML 2.0". Click **Create**
Enter **Cloud CMS** for "App name". This is only an example. It can be any name you like.
Click **Next**
You will see the following form:
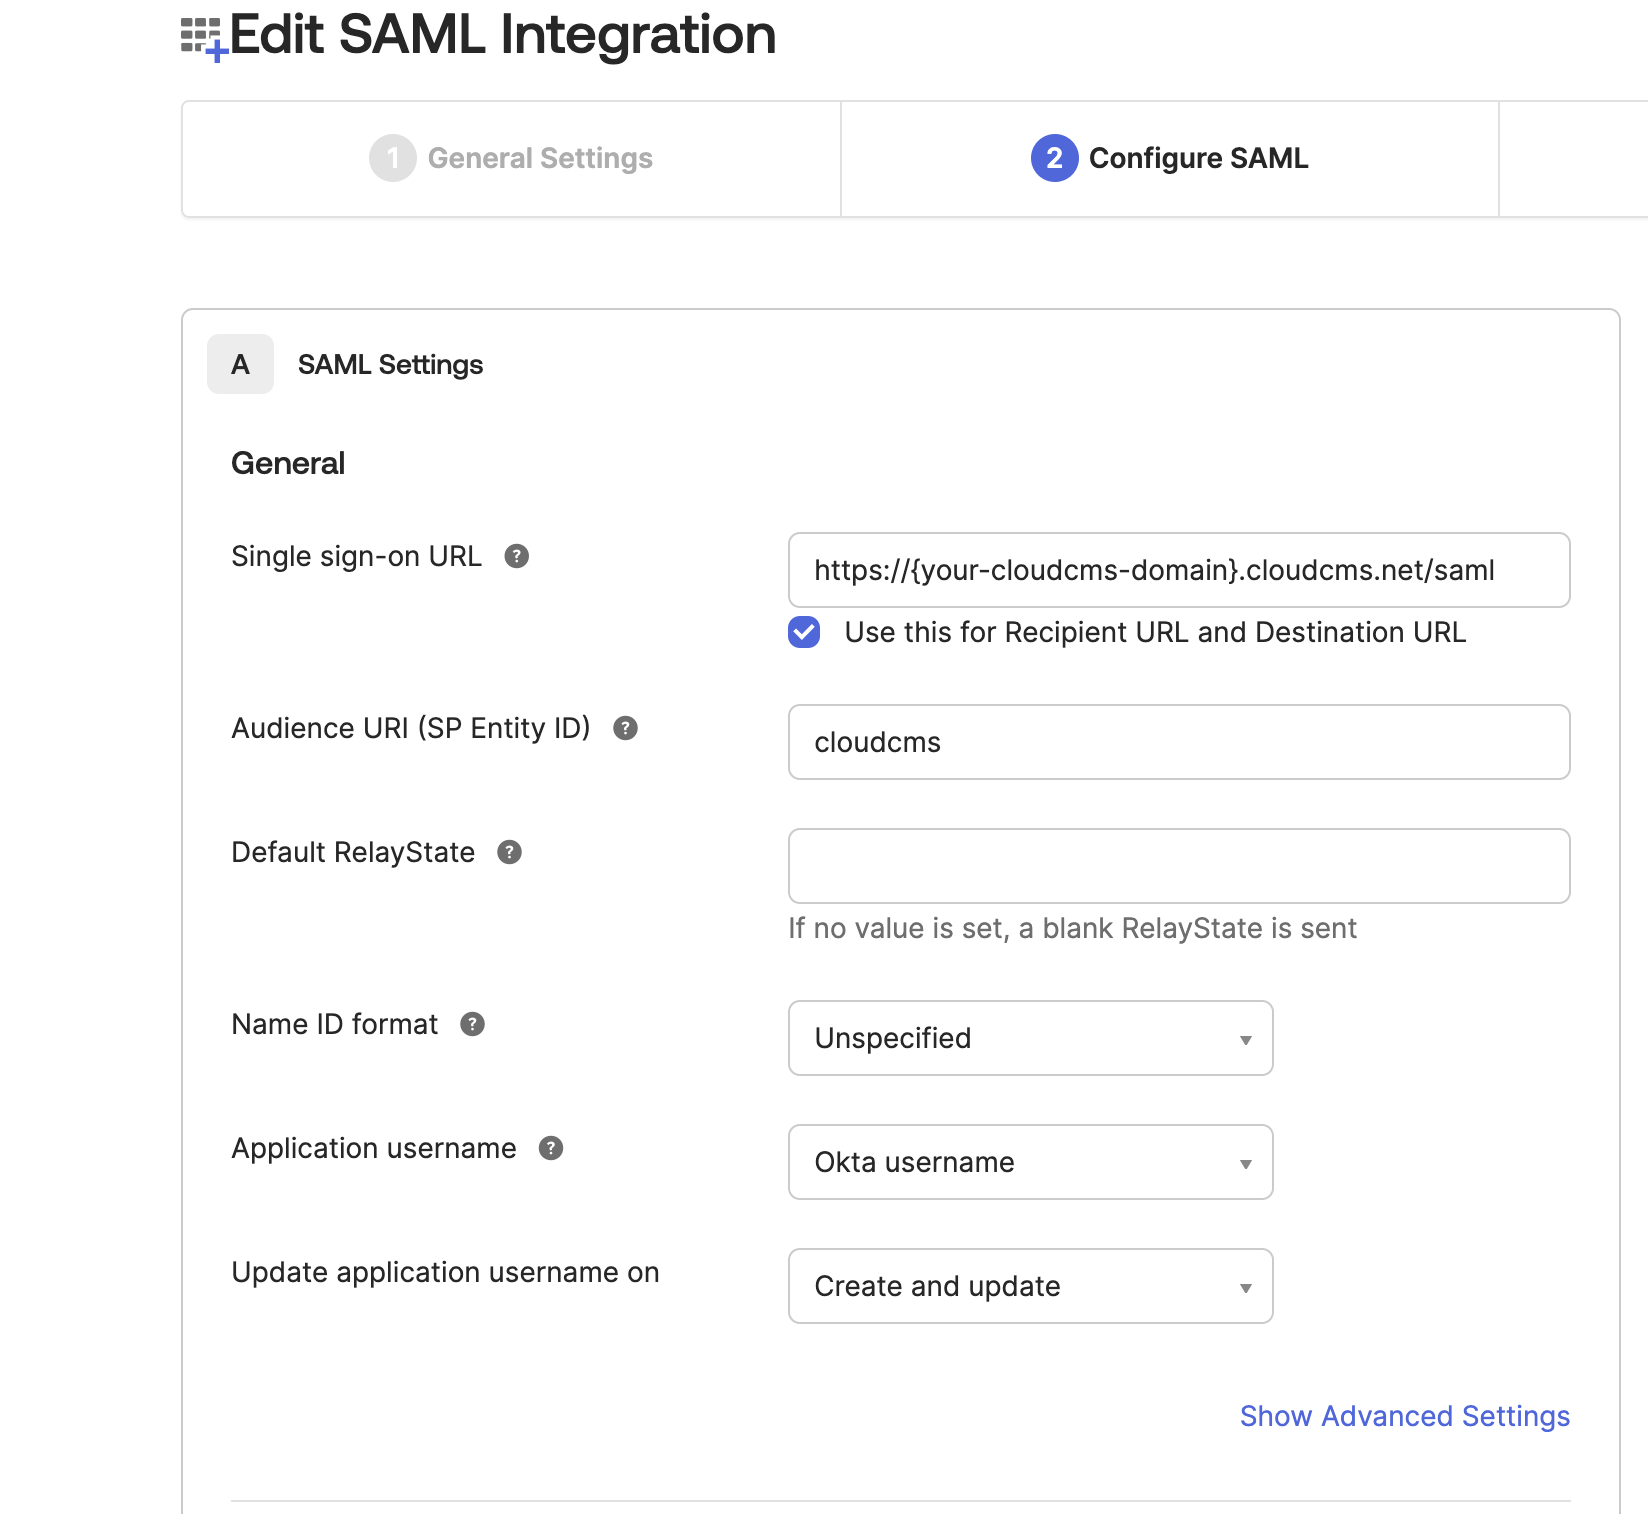
For Single sign on URL enter the Cloud CMS Assertion Consumer Service URL: https://{your-cloudcms-domain}.cloudcms.net/saml
Enter **cloudcms** for "Audience URI". Remember this value as it is required in the Cloud CMS SSO configuration in a future step. This value is only an example. It can be any name you like.
Click **Next** and **Finish**
From the "General" settings of the new "Application", copy the URL value under **EMBED LINK**. You will need this URL in the **Set up Cloud CMS** step below.
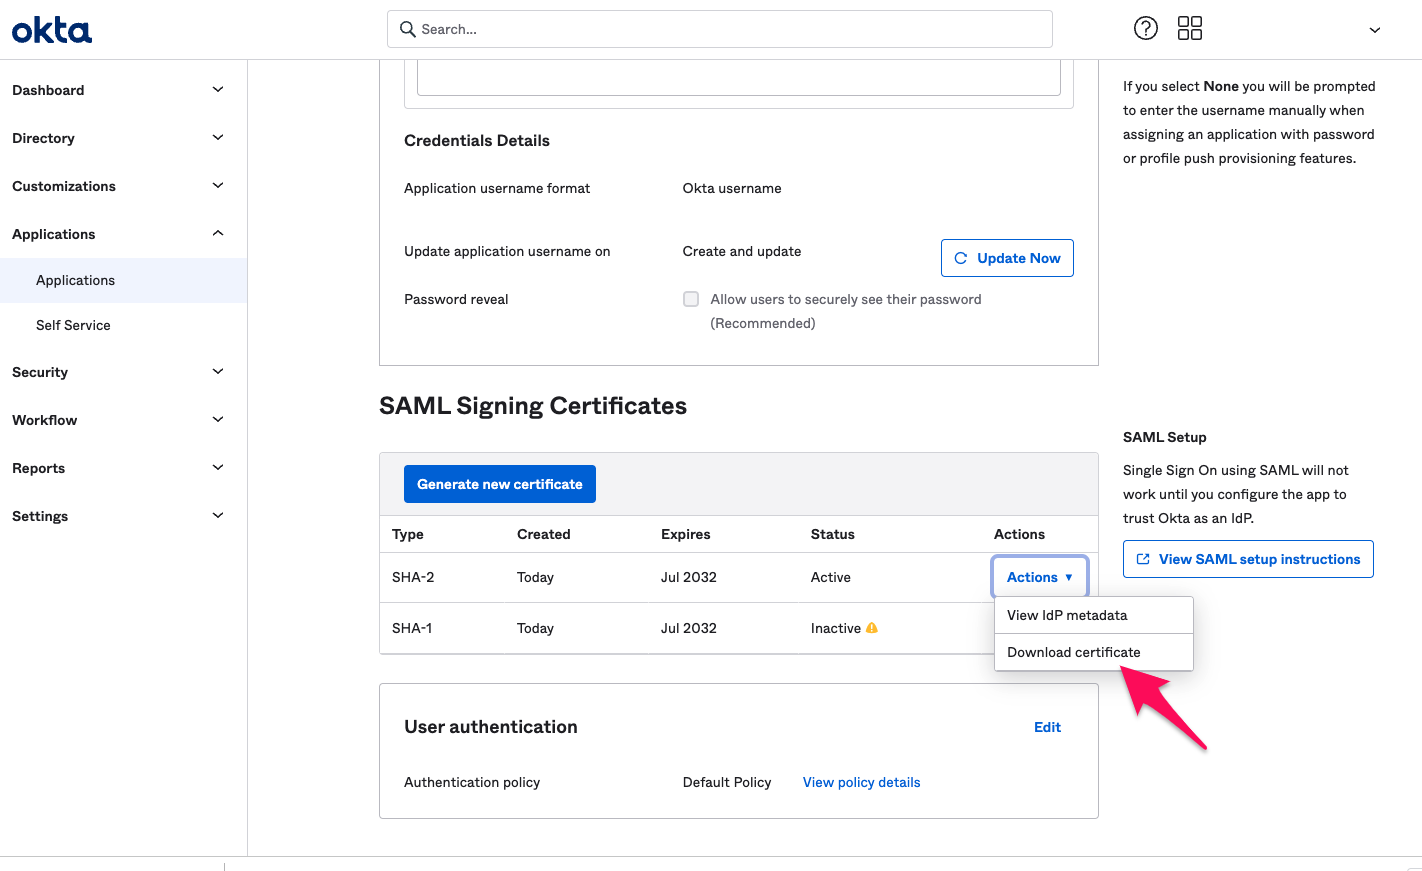
From "SAML Signing Certificates" download a certificate. Use this for the **Certificate** in the **Set up Cloud CMS** step below.
### Mappings
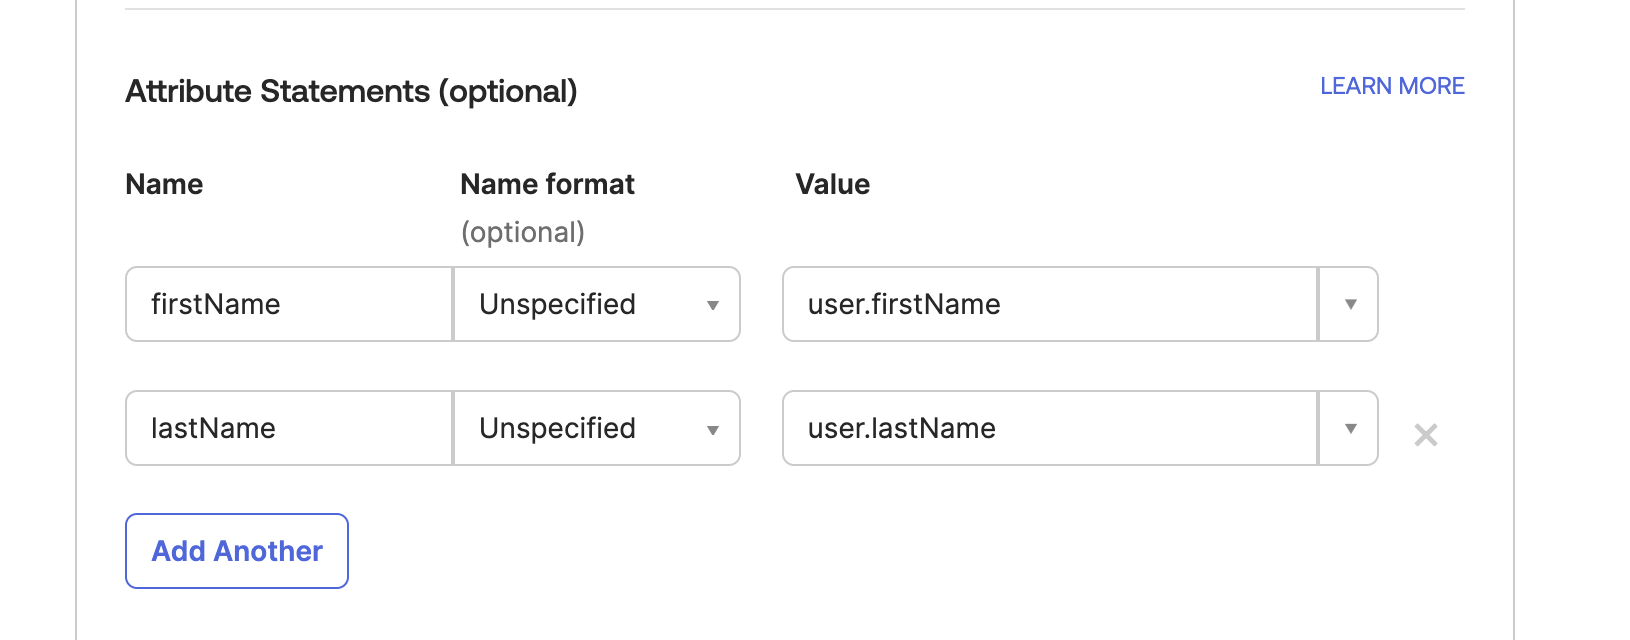
To have custom user properties map to your Cloud CMS users, you'll want to configure the **User Mappings** for each property to map to a subproperty of the **user** object in the SAML response, like so:
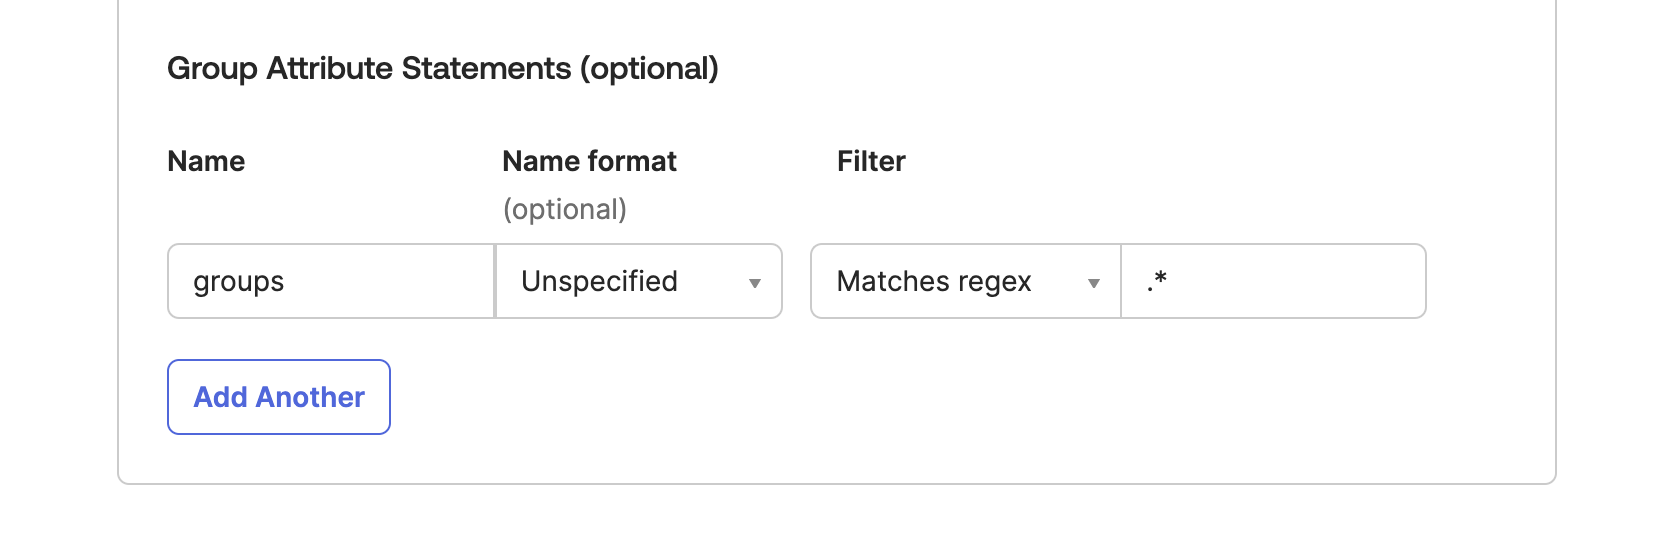
In order for Cloud CMS to map groups from your Okta users, ensure to map all relevant group ids to the **groups** property like this:
### SAML Assertion
Once you've set up your mappings, you ought to be able to preview the SAML Assertion for your user. It should look something like this:
```
http://www.okta.com/xyz123
joesmith@company.com
cloudcms
urn:oasis:names:tc:SAML:2.0:ac:classes:PasswordProtectedTransport
Joe
Smith
Everyone
cheeseheads
```
Your own assertion may vary. However, there are some important things to verify:
1. The `` entry identifies the primary key for your user. In this case, it's the email address (`joesmith@company.com`) of the user. If your own Okta installation uses a different primary key (such as a GUID), you may need to change the _User Primary Identifier Field_ to an attribute value (see next steps).
2. The `` entries hold fields that are mapped from your Okta user schema to the assertion. In this case, we've mapped `firstName` and `lastName`. In Okta, we do this by setting the assertion field `firstName` to the value of `user.firstName`. Okta's expression language evaluates this and plugs in the correct value on the fly.
3. The `MEMBERS` attribute is multi-value and provides a set of identifiers. Typically, these identifiers are used to execute user sync rules that automatically assign users to specific teams or projects.
### Add a User to the App
From the Admin console, select "Directory" and "People" from the top menu.
Select a user account and click the **Assign Applications** button.
A list of applications is displayed. It should now include "Cloud CMS".
Click the **Assign** button and then **Done**.
## Set up Cloud CMS
In a new browser window, log into the Cloud CMS user interface. Click on `Manage Platform` and then pick `SSO` on the left-hand menu.
Select `SAML 2.0` from the radio button list.
And then fill out the form.
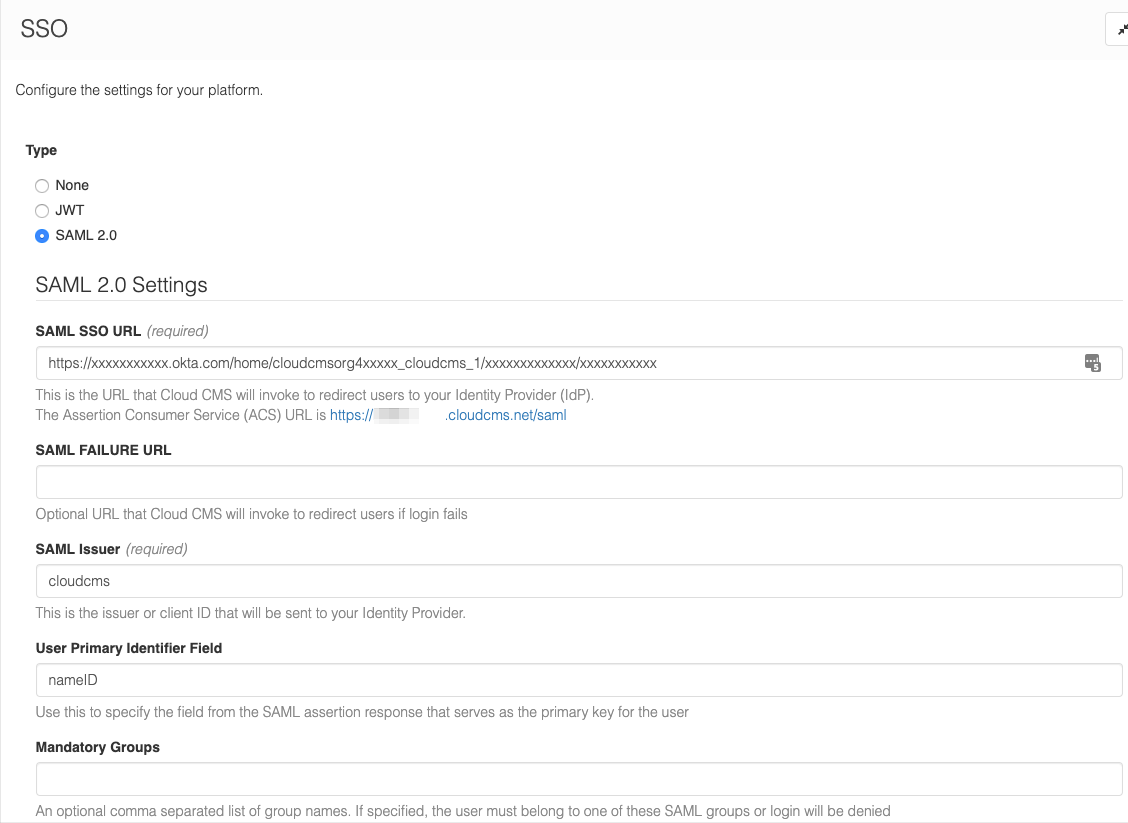
The following is required:
1. The `SAML URL` should be the **EMBED LINK** value you copied from the Okta "Application" you created above.
2. The `SAML Issuer` should match the Okta Application's **Audience URI**
3. Enter the PEM formatted certificate you downloaded from the Okta "Application" you created above into **Certificate**
Don't forget to save your changes!
### User Field Mappings (optional)
Under User Field Mappings, you can set up the following:
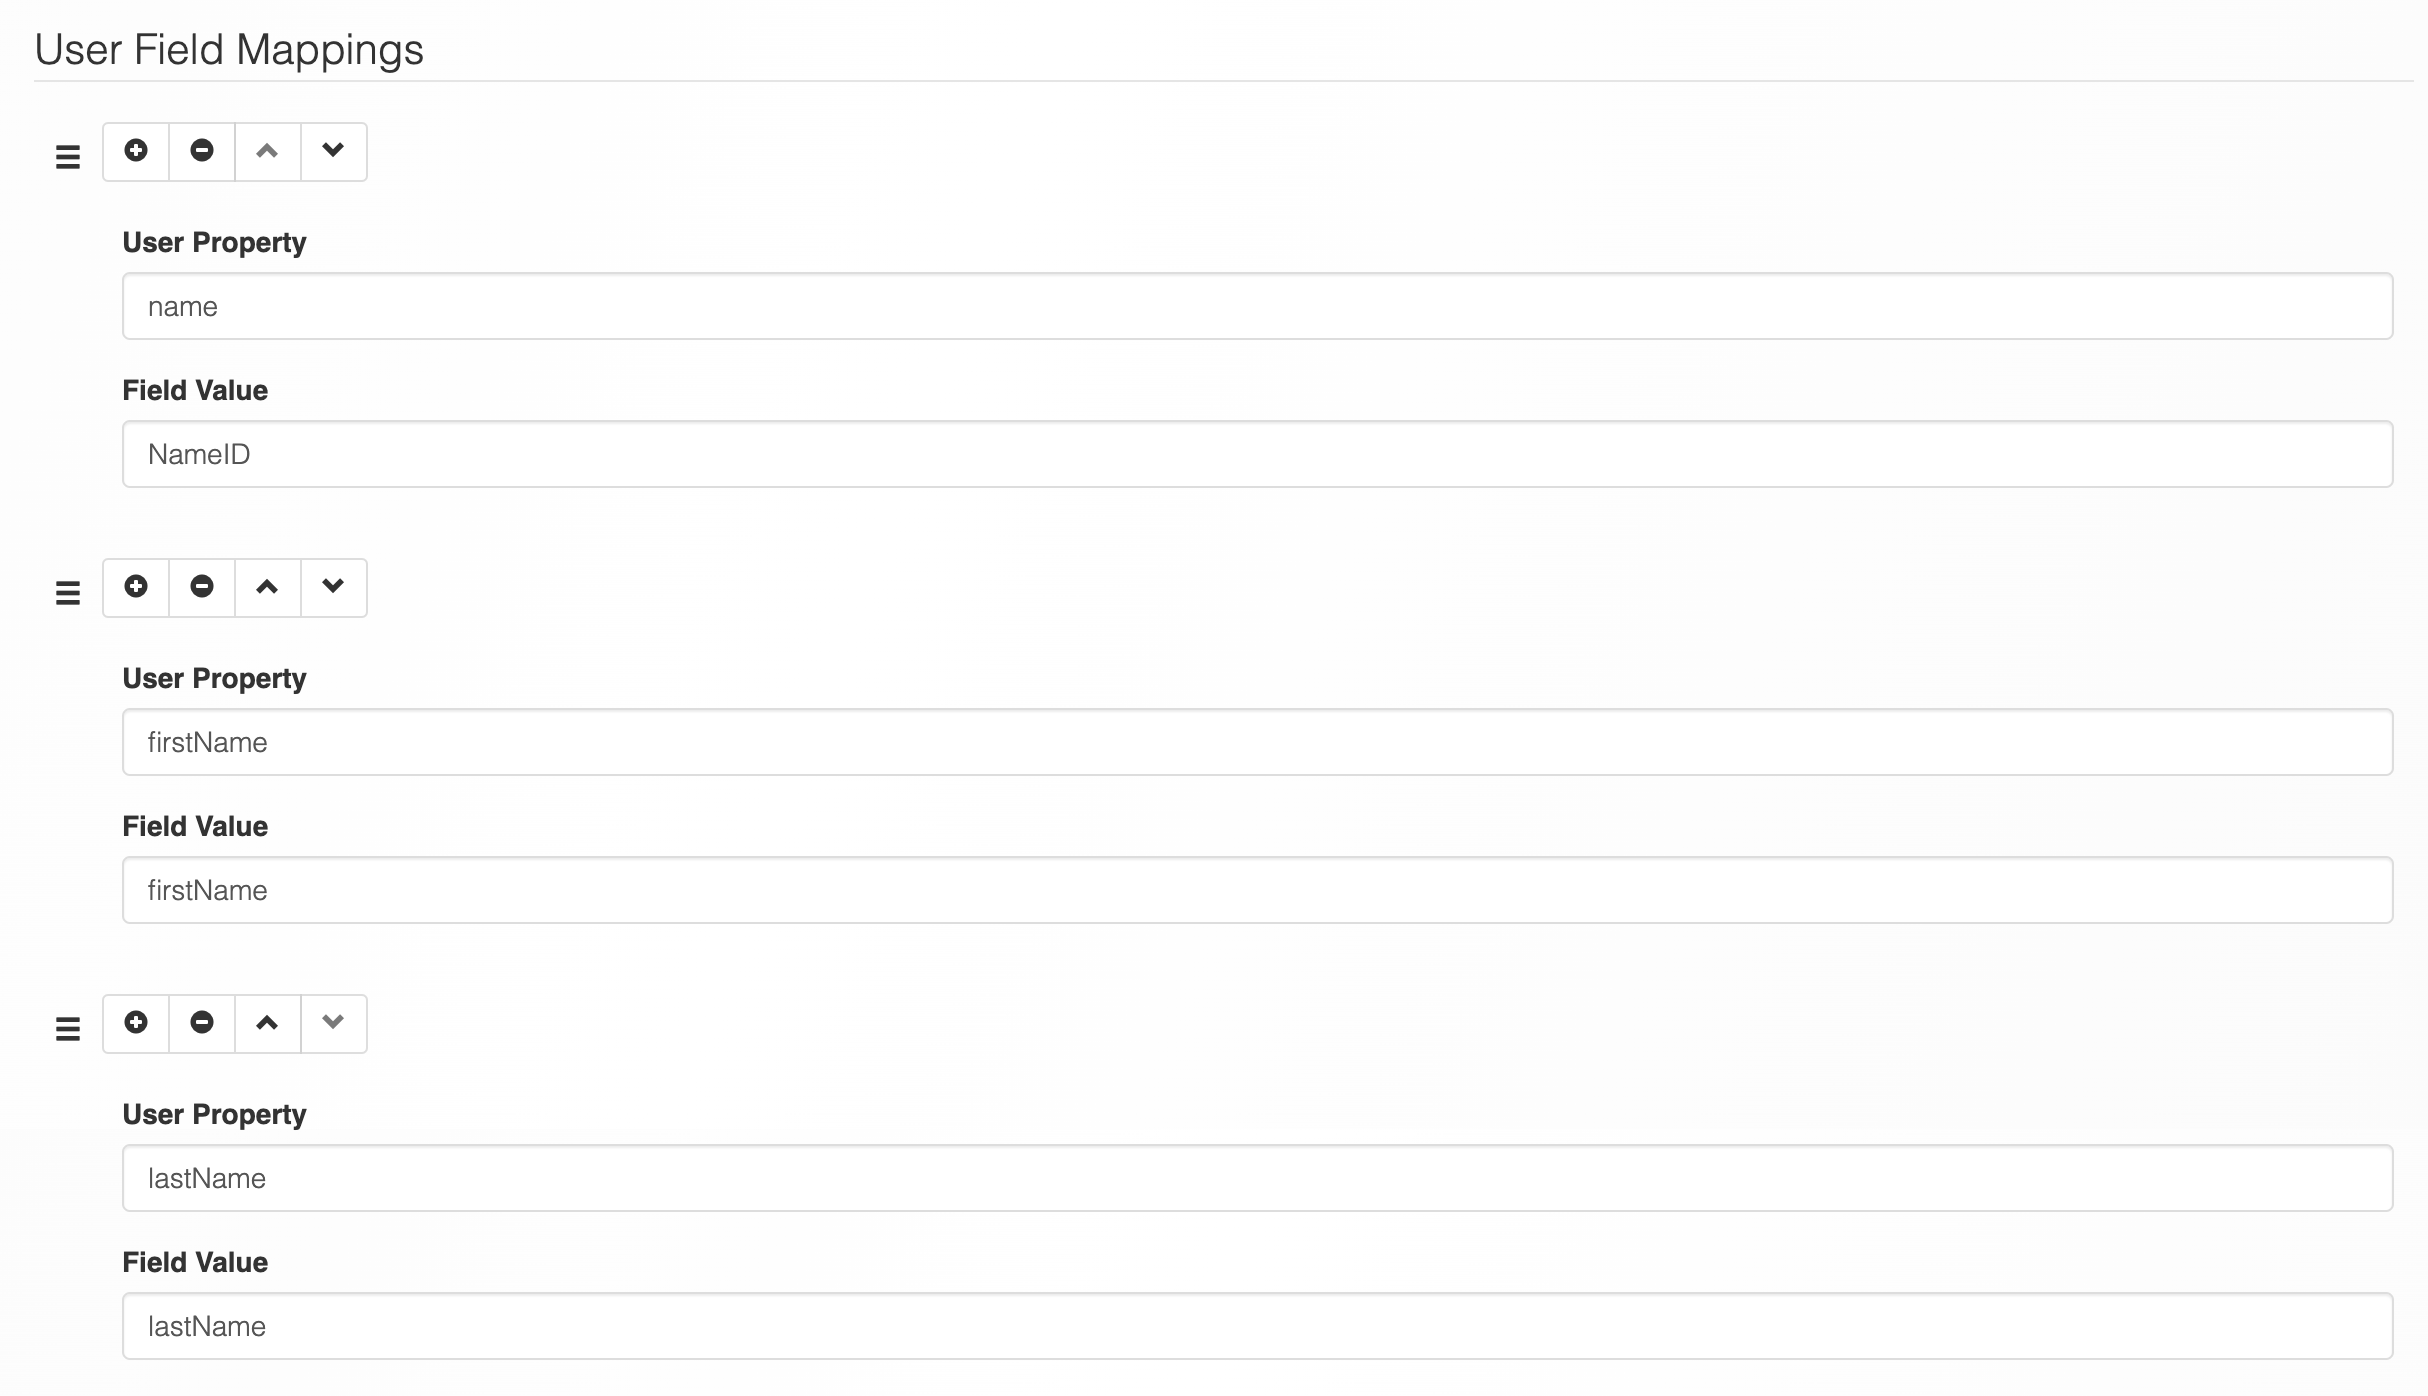
Where:
- `name` takes on the SAML Assertion value for `NameID`
- `firstName` takes on the SAML Assertion attribute value for `firstName`
- `lastName` takes on the SAML Assertion attribute value for `lastName`
Considering the SAML Assertion provided above, this would result in your synchronized user having a `name` of This will result in your synced user having a `name` of `joesmith@company.com`, a first name of `Joe` and a last name of `Smith`.
Don't forget to save your changes!
### Group Mappings (optional)
Under Group Mappings, you can drive behaviors based on what groups the user belongs to. These groups are expressed in the SAML Assertion via the `MEMBERS` attribute. They may also be expressed within the SAML Assertion via the `GROUPS` attribute.
In the SAML Assertion above, Joe Smith belongs to the `cheeseheads` group. We can set up a mapping rule so that any users who are members of the `cheeseheads` group are automatically added to a platform team.
Here is an example:
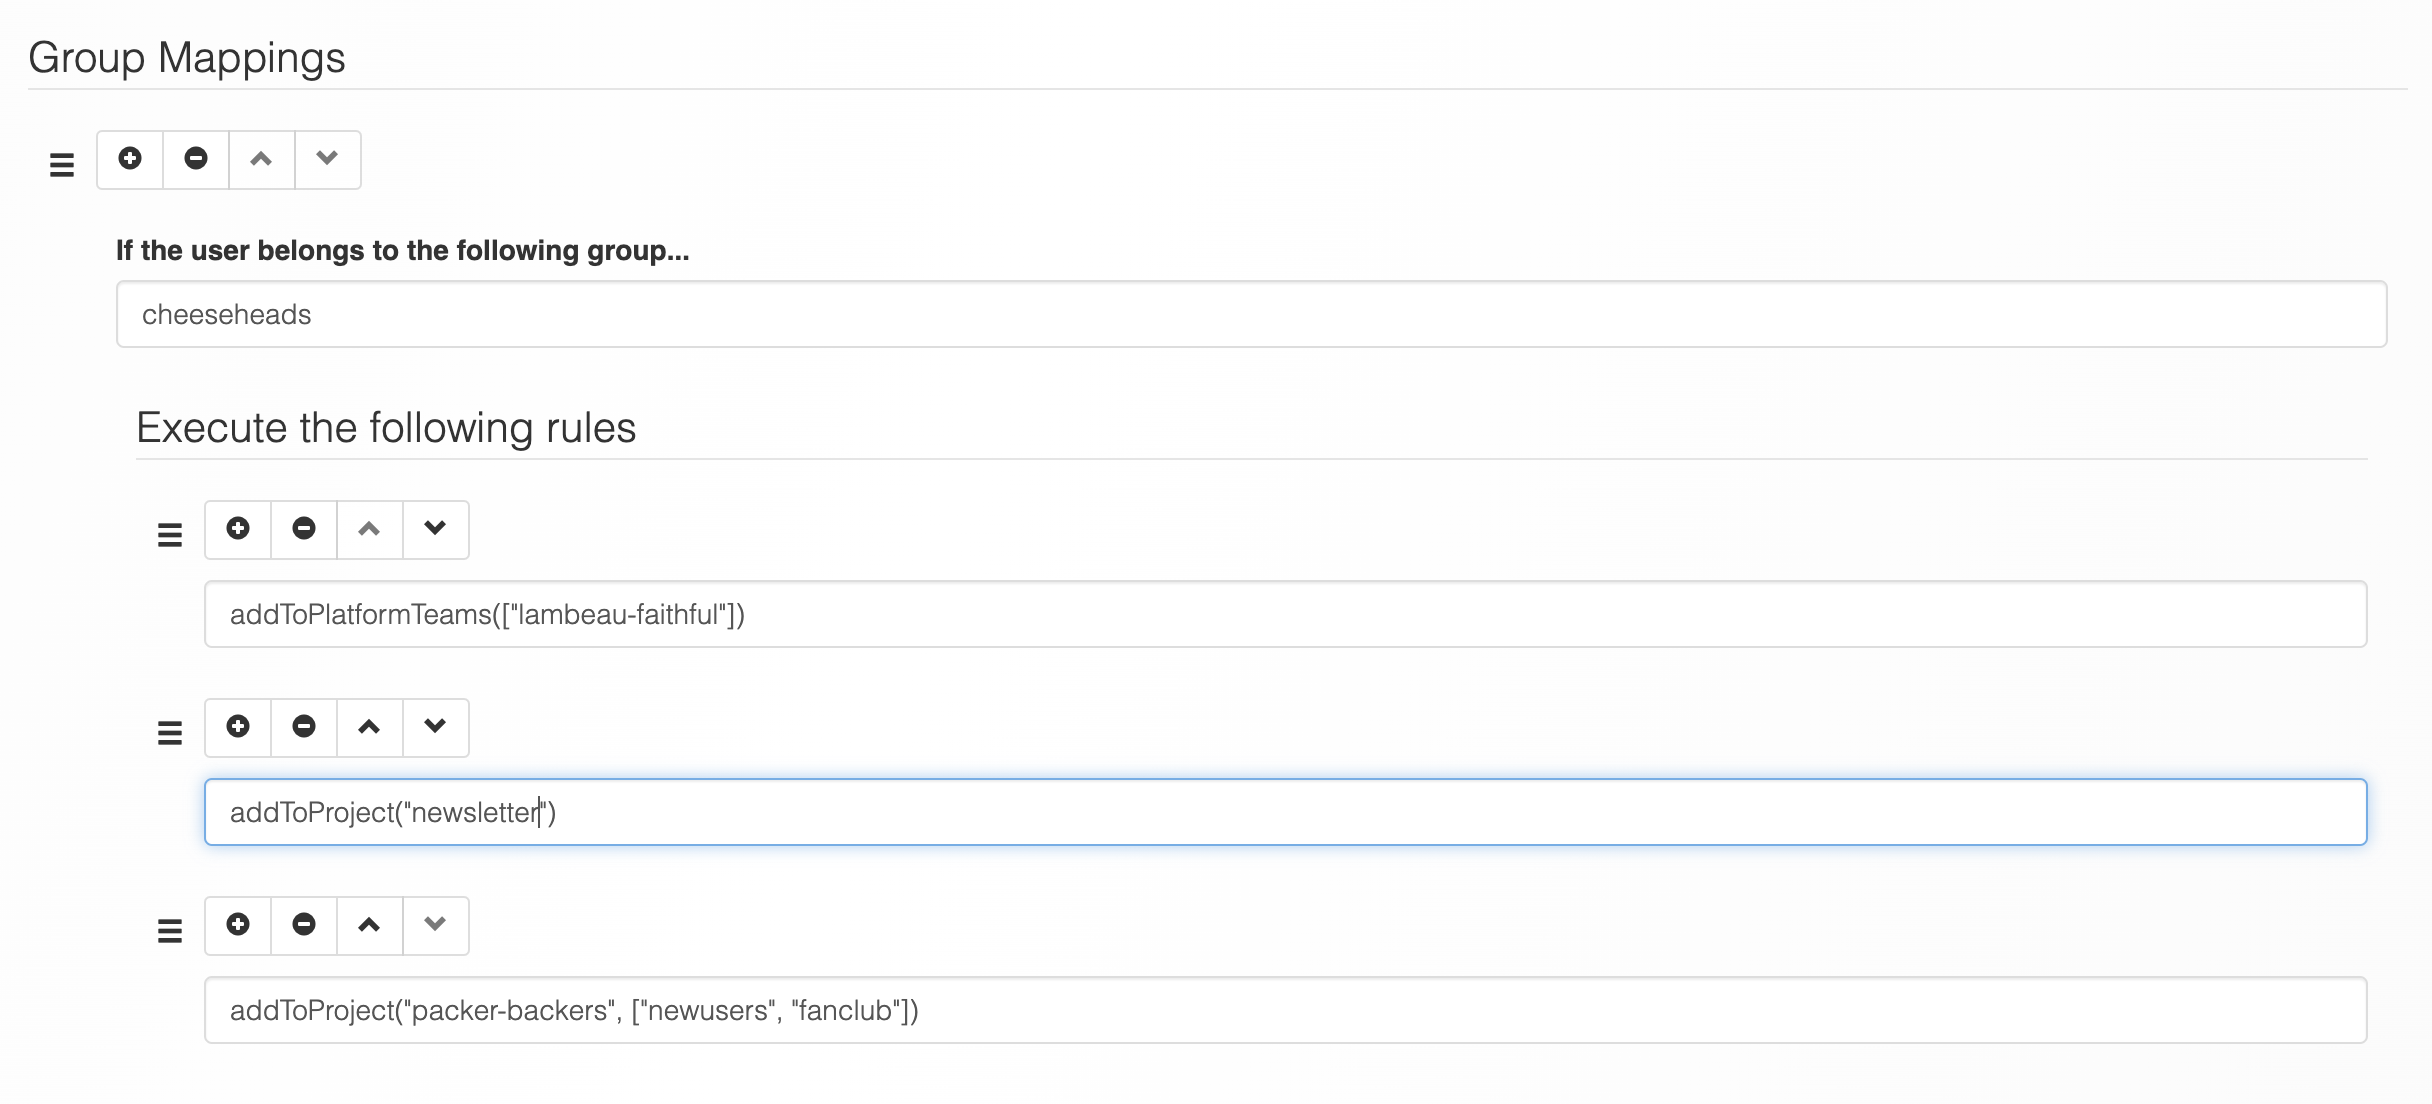
Let's see what we've done:
1. Any users who belong to the `cheeseheads` group in the SAML Assertion will be added to the Platform Team identified by the team key `lambeau-faithful`. This is done by running the function `addToPlatformTeams(["lambeau-faithful"])`.
2. Any users who belong to the `cheeseheads` group in the SAML Assertion will be added to the `newsletter` Project. This is done by running the function `addToProject("newsletter")`.
3. Any users who belong to the `cheeseheads` group in the SAML Assertion will be added to the `packer-backers` Project. They will also be added to the `newusers` and `fanclub` teams for that Project. This is done by running the function `addToProject"packer-backers", ["newusers", "fanclub"])`.
You should be able to set up similar rules to automatically have your users added to specific Projects and Teams based on their IdP-managed profile.
Don't forget to save your changes!
## Verify it works
You can now verify that Cloud CMS is configured to use SAML 2.0:
- Log out of your current Cloud CMS account
- Log back in
- While Logging in again, you will be re-directed to Okta
- Log into Okta with your username and password.
- If the credentials match, you will be redirected back to Cloud CMS.
- Cloud CMS will automatically log you in and create your user if it doesn't yet exist.